JWT Token Authentication And Authorizations In Web API
I will walk you through using the JWT token in your web API.net core project in this step-by-step tutorial. The following topics are covered in this tutorial.
- How to authorize any web API endpoint
- How to create a JWT access token
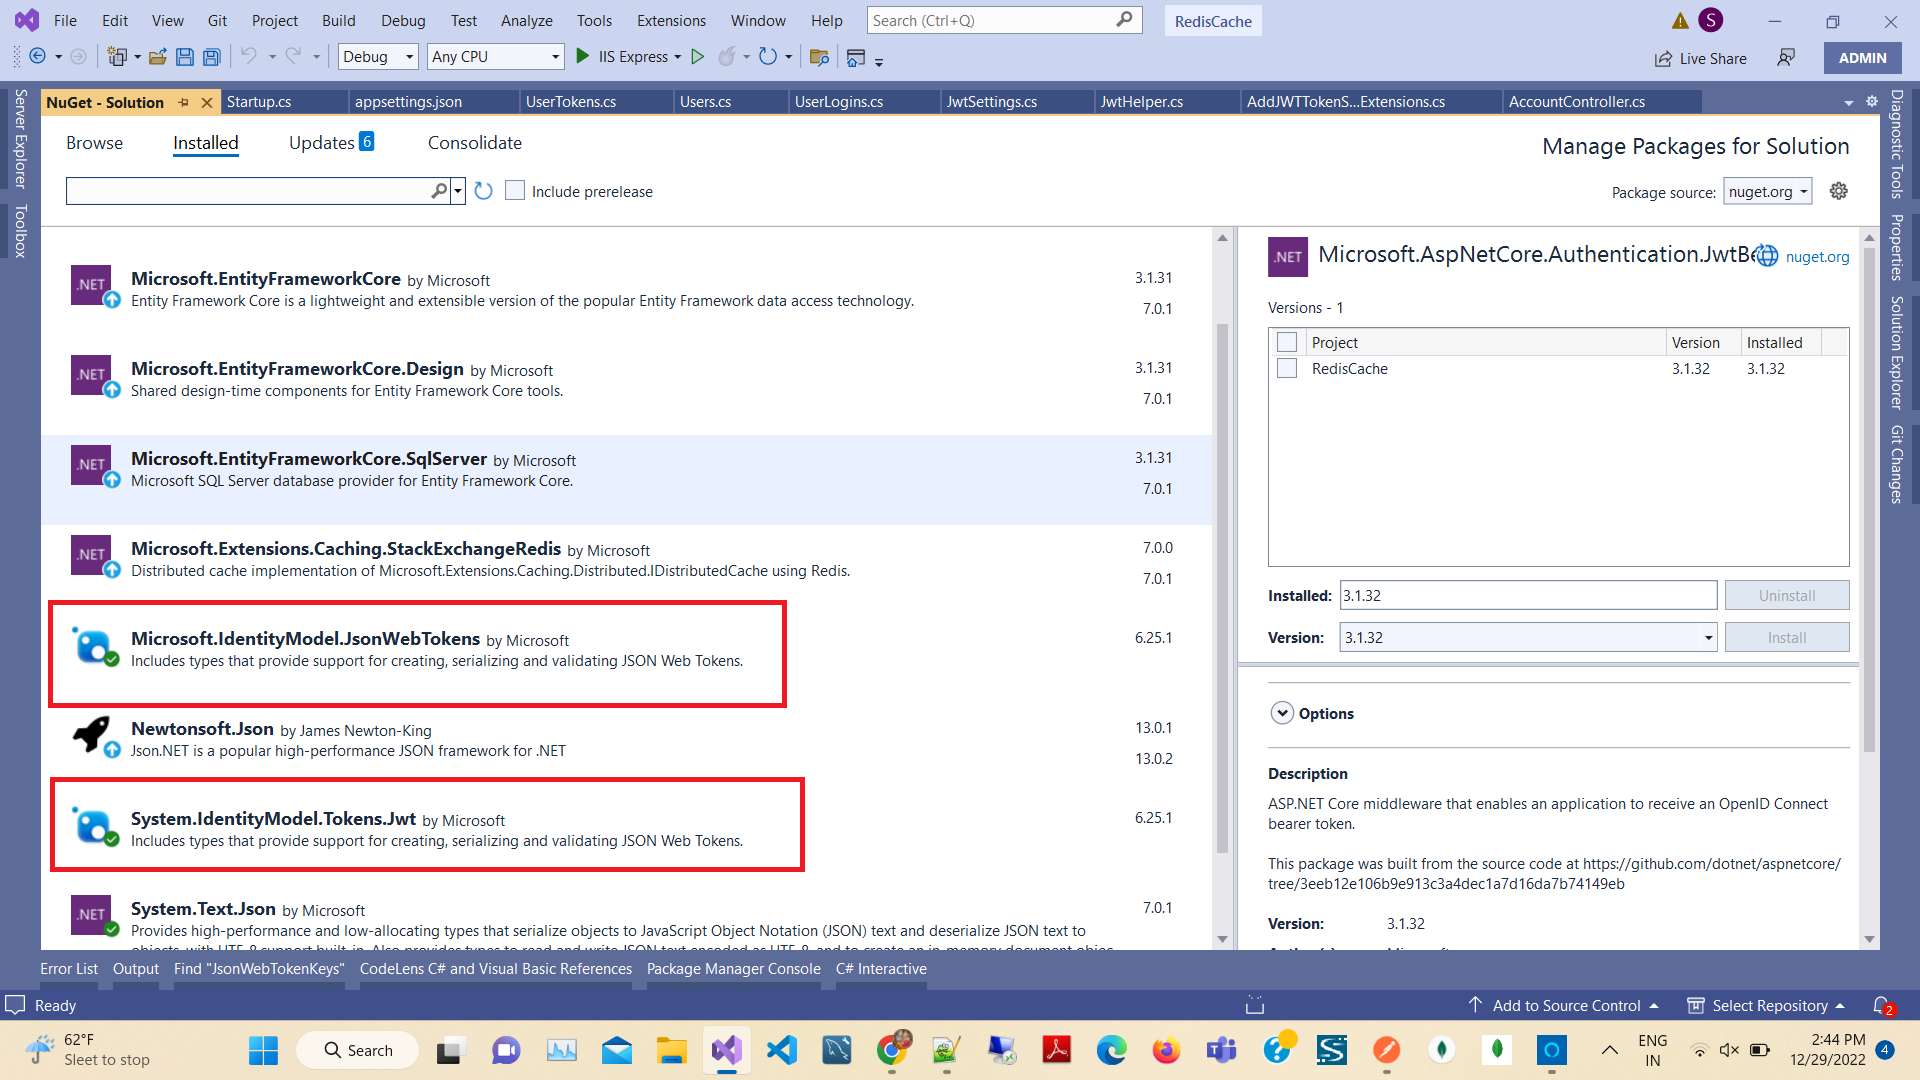
Step 1. Install Nuget Packages
Then open Nuget Package manager and install the latest version of the following packages,
- Microsoft.AspNetCore.Authentication.JwtBearer
- Microsoft.IdentityModel.JsonWebTokens
- System.IdentityModel.Tokens.Jwt
Step 2. Add Model and settings
Add a new folder to your project root directory named “Models” and a new class named “JwtSettings” and “UserTokens”.
JwtSettings.cs file,
 public class JwtSettings
    {
        public bool ValidateIssuerSigningKey { get; set; }
        public string IssuerSigningKey { get; set; }
        public bool ValidateIssuer { get; set; } = true;
        public string ValidIssuer { get; set; }
        public bool ValidateAudience { get; set; } = true;
        public string ValidAudience { get; set; }
        public bool RequireExpirationTime { get; set; }
        public bool ValidateLifetime { get; set; } = true;
    }
UserTokens.cs file
  public class UserTokens
    {
        public string Token { get; set; }

        public string UserName { get; set; }

        public TimeSpan Validaty { get; set; }

        public string RefreshToken { get; set; }

        public Guid Id { get; set; }

        public string EmailId { get; set; }

        public Guid GuidId { get; set; }

        public DateTime ExpiredTime { get; set; }

    }
After that, we need to add some settings to the app settings so that we can change the global settings for the token generation from appsettings.json without changing any LOCs (Lines of Code).
Note: Please remember to modify the local URL for the valid audience and issuer.
appsettings.json
  "JsonWebTokenKeys": {
    "ValidateIssuerSigningKey": true,
    "IssuerSigningKey": "64A63153-11C1-4919-9133-EFAF99A9B456",
    "ValidateIssuer": true,
    "ValidIssuer": "https://localhost:44386",
    "ValidateAudience": true,
    "ValidAudience": "https://localhost:44386",
    "RequireExpirationTime": true,
    "ValidateLifetime": true
  }
The next step is to add the JWT Helper class that is used to create a Token and Refresh the Token and validate of Token.
To add a class first create a “JwtHelpers” folder in the root project then create a class "JwtHelper".
Add the code given below,
using Microsoft.IdentityModel.Tokens;
using System.IdentityModel.Tokens.Jwt;
using System.Security.Claims;
using RedisCache.Models;
using System.Collections.Generic;
using System;
using Microsoft.IdentityModel.Protocols;
using System.Linq;
using System.Text;

namespace RedisCache.JwtHelpers
{
    public static class JwtHelper
    {
        public static IEnumerable<Claim> GetClaims(this UserTokens userAccounts, Guid Id)
        {
            IEnumerable<Claim> claims = new Claim[] {
                new Claim("Id", userAccounts.Id.ToString()),
                    new Claim(ClaimTypes.Name, userAccounts.UserName),
                    new Claim(ClaimTypes.Email, userAccounts.EmailId),
                    new Claim(ClaimTypes.NameIdentifier, Id.ToString()),
                    new Claim(ClaimTypes.Expiration, DateTime.UtcNow.AddDays(1).ToString("MMM ddd dd yyyy HH:mm:ss tt"))
            };
            return claims;
        }
        public static IEnumerable<Claim> GetClaims(this UserTokens userAccounts, out Guid Id)
        {
            Id = Guid.NewGuid();
            return GetClaims(userAccounts, Id);
        }
        public static UserTokens GenTokenkey(UserTokens model, JwtSettings jwtSettings)
        {
            try
            {
                var UserToken = new UserTokens();
                if (model == null) throw new ArgumentException(nameof(model));
                // Get secret key
                var key = System.Text.Encoding.ASCII.GetBytes(jwtSettings.IssuerSigningKey);
                Guid Id = Guid.Empty;
                DateTime expireTime = DateTime.UtcNow.AddDays(1);
                UserToken.Validaty = expireTime.TimeOfDay;
                var JWToken = new JwtSecurityToken(issuer: jwtSettings.ValidIssuer, audience: jwtSettings.ValidAudience, claims: GetClaims(model, out Id), notBefore: new DateTimeOffset(DateTime.Now).DateTime, expires: new DateTimeOffset(expireTime).DateTime, signingCredentials: new SigningCredentials(new SymmetricSecurityKey(key), SecurityAlgorithms.HmacSha256));
                UserToken.Token = new JwtSecurityTokenHandler().WriteToken(JWToken);
                UserToken.UserName = model.UserName;
                UserToken.Id = model.Id;
                UserToken.GuidId = Id;
                return UserToken;
            }
            catch (Exception)
            {
                throw;
            }
        }

        public static string ValidateToken(string token , JwtSettings jwtSettings)
        {
            if (token == null)
                return null;

            var tokenHandler = new JwtSecurityTokenHandler();
            var key = Encoding.ASCII.GetBytes(jwtSettings.IssuerSigningKey);
            try
            {
                tokenHandler.ValidateToken(token, new TokenValidationParameters
                {
                    ValidateIssuerSigningKey = true,
                    IssuerSigningKey = new SymmetricSecurityKey(key),
                    ValidateIssuer = false,
                    ValidateAudience = false,
                    // set clockskew to zero so tokens expire exactly at token expiration time (instead of 5 minutes later)
                    ClockSkew = TimeSpan.Zero
                }, out SecurityToken validatedToken);

                var jwtToken = (JwtSecurityToken)validatedToken;
                var email =  jwtToken.Claims.Single(x => x.Type == ClaimTypes.Email).Value;
                var userName = jwtToken.Claims.Single(Name => Name.Type == ClaimTypes.Name).Value;

                // return user id from JWT token if validation successful
                return email;
            }
            catch
            {
                // return null if validation fails
                return null;
            }
        }
    }
}
So, to inject services let's create a New Class named “AddJWTTokenServicesExtensions” to the separation of concern without messing off the Startup.cs first create a folder named “Extensions” in your root project. Then create the class AddJWTTokenServicesExtensions.
 public static class AddJWTTokenServicesExtensions
    {
        public static void AddJWTTokenServices(IServiceCollection Services, IConfiguration Configuration)
        {
            // Add Jwt Setings
            var bindJwtSettings = new JwtSettings();
            Configuration.Bind("JsonWebTokenKeys", bindJwtSettings);
            Services.AddSingleton(bindJwtSettings);
            Services.AddAuthentication(options =>
            {
                options.DefaultAuthenticateScheme = JwtBearerDefaults.AuthenticationScheme;
                options.DefaultChallengeScheme = JwtBearerDefaults.AuthenticationScheme;
            }).AddJwtBearer(options =>
            {
                options.RequireHttpsMetadata = false;
                options.SaveToken = true;
                options.TokenValidationParameters = new Microsoft.IdentityModel.Tokens.TokenValidationParameters()
                {
                    ValidateIssuerSigningKey = bindJwtSettings.ValidateIssuerSigningKey,
                    IssuerSigningKey = new SymmetricSecurityKey(System.Text.Encoding.UTF8.GetBytes(bindJwtSettings.IssuerSigningKey)),
                    ValidateIssuer = bindJwtSettings.ValidateIssuer,
                    ValidIssuer = bindJwtSettings.ValidIssuer,
                    ValidateAudience = bindJwtSettings.ValidateAudience,
                    ValidAudience = bindJwtSettings.ValidAudience,
                    RequireExpirationTime = bindJwtSettings.RequireExpirationTime,
                    ValidateLifetime = bindJwtSettings.RequireExpirationTime,
                    ClockSkew = TimeSpan.FromDays(7),
                };
            });
        }
    }
Add using in the first line of the Startup.cs
using RedisCache.Extensions;
inject class in configureservices
        public void ConfigureServices(IServiceCollection services)
        {
            services.AddControllers();
            services.AddControllersWithViews();

            services.AddDbContext<DbEmployeeContext>(options => options.UseSqlServer(Configuration.GetConnectionString("DefaultConnection")));
            services.AddStackExchangeRedisCache(options =>
            {
                options.Configuration = Configuration["RedisCacheServerUrl"];
            });

            AddJWTTokenServicesExtensions.AddJWTTokenServices(services, Configuration);
        }
Let's move to the next step which is controller implementations.
Add new WebAPI Controller Named “AccountController”
Here we don’t use any database, we just static values to validate a user and generate Access Token and Authenticate and Authorized Web API Controller
Create add new class Users in models folders
With the following code.
   public class Users
    {
        public string UserName { get; set; }

        public Guid Id { get; set; }

        public string EmailId { get; set; }

        public string Password { get; set; }

    }
Create new class UserLogins in models folders with the following code.
 public class UserLogins
    {
        [Required]
        public string UserName { get; set; }

        [Required]
        public string Password { get; set; }

        public UserLogins() { }
    }
Add new Controller -> API In templates and Rights side Select API Controller -> Empty.
    [Route("api/[controller]/[action]")]
    [ApiController]
    public class AccountController : ControllerBase
    {
        private readonly JwtSettings jwtSettings;

        private readonly DbEmployeeContext _context;

        public AccountController(JwtSettings jwtSettings, DbEmployeeContext context)
        {
            this.jwtSettings = jwtSettings;
            _context = context;
        }

        private IEnumerable<Users> logins = new List<Users>() {
            new Users() {
                    Id = Guid.NewGuid(),
                        EmailId = "admin@gmail.com",
                        UserName = "Admin",
                        Password = "Admin",
                }
        };
        [HttpPost]
        public IActionResult GetToken(UserLogins userLogins)
        {
            try
            {
                var Token = new UserTokens();
                var Valid = logins.Any(x => x.UserName.Equals(userLogins.UserName, StringComparison.OrdinalIgnoreCase));
                if (Valid)
                {
                    var user = logins.FirstOrDefault(x => x.UserName.Equals(userLogins.UserName, StringComparison.OrdinalIgnoreCase));
                    Token = JwtHelper.GenTokenkey(new UserTokens()
                    {
                        EmailId = user.EmailId,
                        GuidId = Guid.NewGuid(),
                        UserName = user.UserName,
                        Id = user.Id,
                    }, jwtSettings);
                }
                else
                {
                    return BadRequest("wrong password");
                }
                return Ok(Token);
            }
            catch (Exception ex)
            {
                throw;
            }
        }
        /// <summary>
        /// Get List of UserAccounts
        /// </summary>
        /// <returns>List Of UserAccounts</returns>
        [HttpGet]
        [Authorize(AuthenticationSchemes = Microsoft.AspNetCore.Authentication.JwtBearer.JwtBearerDefaults.AuthenticationScheme)]
        public async Task<IActionResult> GetList()
        {
            var products = await _context.Products.ToListAsync();
            string authHeader = this.HttpContext.Request.Headers["Authorization"];
            authHeader = authHeader.Substring("Bearer ".Length).Trim();
            var email = JwtHelper.ValidateToken(authHeader, jwtSettings);
            return Ok(products);
        }
    }
In the above Account, the controller created a List of Login Details that are valid users. You can use database records to validate user logins. Next, we created a method to validate login credentials and generate tokens with the help of JWT Hepler.
For testing the API we use postman,
https://localhost:44386/api/Account/GetToken
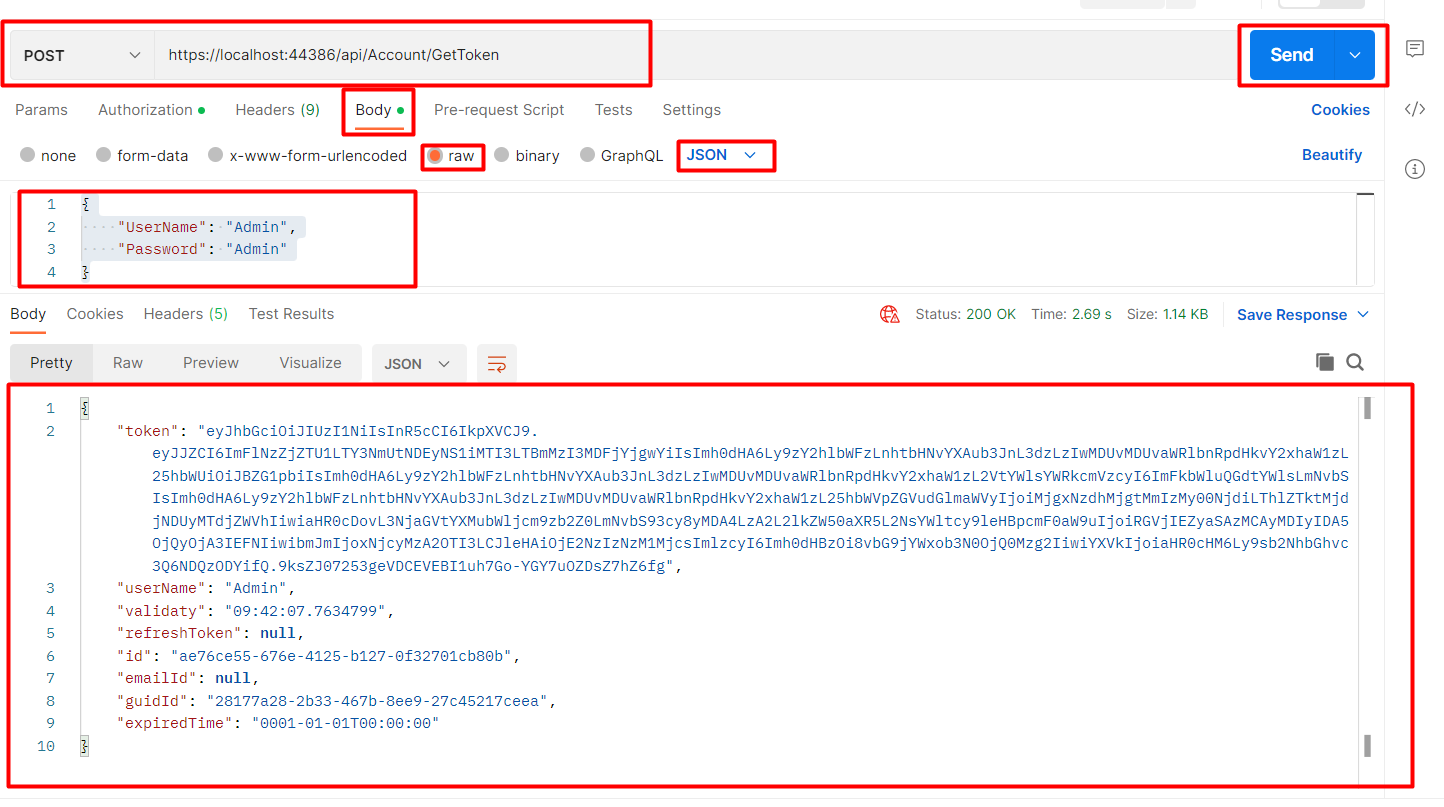 Here you get the token string
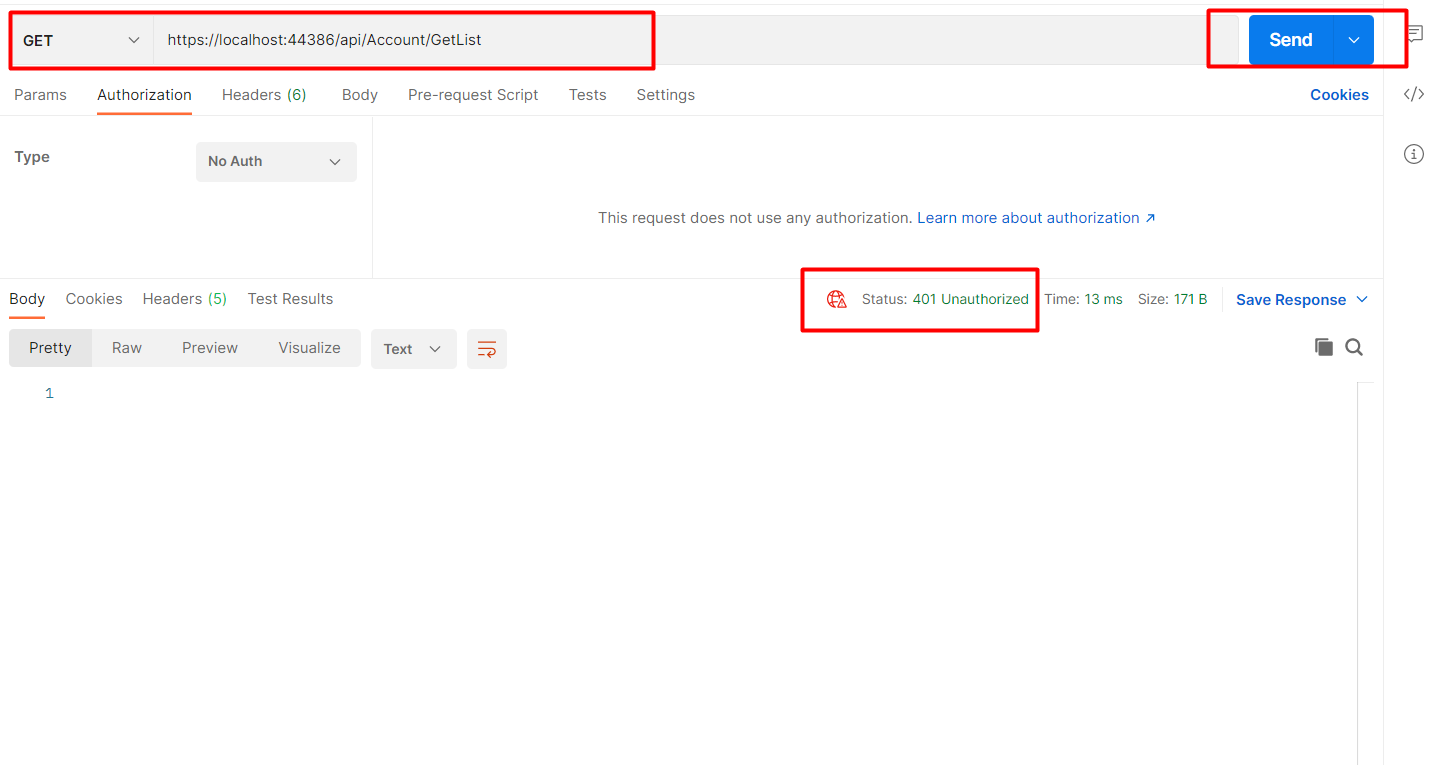
https://localhost:44386/api/Account/GetList
Without passing the token result will be shown below it will give a 401 error.
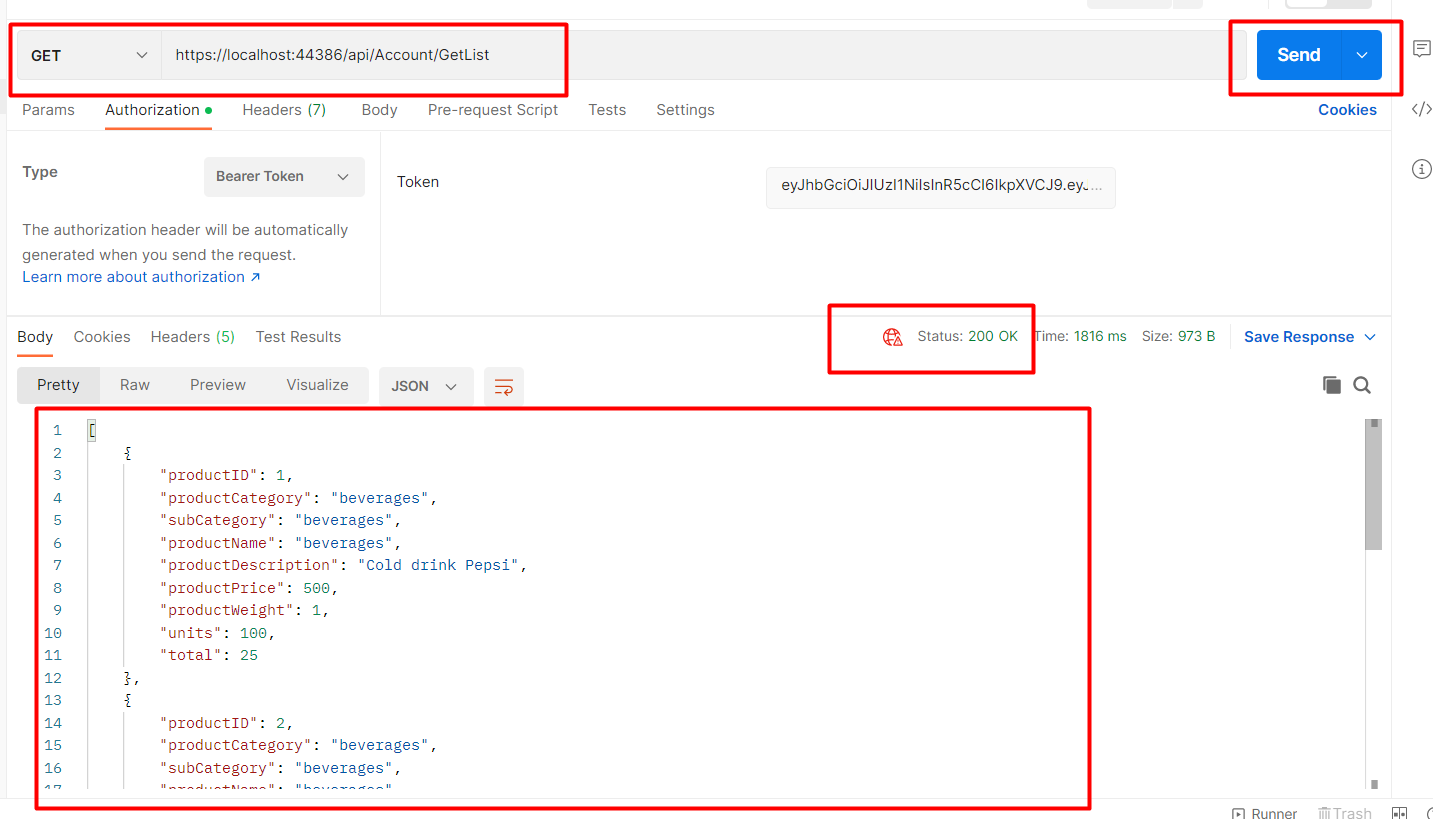
To Validate or pass the token in the header click on the Authorization tab change the type to bearer token paste generated token in the textbox and then click on send button

In conclusion,
I described the procedure for generating a JWT access token in this article. Additionally, we were shown how to authorize the WEB API endpoint.
