Login Register
Code2night
  • Home
  • Blog Archive
  • Learn
    • Tutorials
    • Videos
  • Interview Q&A
  • Resources
    • Cheatsheets
    • Tech Comparisons
  • Languages
    • Angular Angular js ASP.NET Asp.net Core ASP.NET Core, C# ASP.NET MVC ASP.NET Web Forms C C# C#, ASP.NET Core, Dapper
      C#, ASP.NET Core, Dapper, Entity Framework DotNet General Web Development HTML, CSS HTML/CSS Java JavaScript JavaScript, HTML, CSS JavaScript, Node.js Node.js
      Python Python 3.11, Pandas, SQL Python 3.11, SQL Python 3.11, SQLAlchemy Python 3.11, SQLAlchemy, SQL Python 3.11, SQLite React Security SQL Server TypeScript
  • Post Blog
  • Tools
    • Beautifiers
      JSON Beautifier HTML Beautifier XML Beautifier CSS Beautifier JS Beautifier SQL Formatter
      Dev Utilities
      JWT Decoder Regex Tester Diff Checker Cron Explainer String Escape Hash Generator Password Generator
      Converters
      Base64 Encode/Decode URL Encoder/Decoder JSON to CSV CSV to JSON JSON to TypeScript Markdown to HTML Number Base Converter Timestamp Converter Case Converter
      Generators
      UUID / GUID Generator Lorem Ipsum QR Code Generator Meta Tag Generator
      Image Tools
      Image Converter Image Resizer Image Compressor Image to Base64 PNG to ICO Background Remover Color Picker
      Text & Content
      Word Counter PDF Editor
      SEO & Web
      SEO Analyzer URL Checker World Clock
  1. Home
  2. Blog
  3. HTML/CSS
  4. Responsive Slick Slider

Responsive Slick Slider

Date- Jul 28,2022 Updated Feb 2026 23149 Free Download Pay & Download
Slick Slider Slick Slider Responsive

Hello guys and welcome to Code2Night! In this tutorial, we're going to delve into the world of web development and explore the amazing capabilities of the Responsive Slick Slider. If you're looking to create a visually stunning and responsive image gallery, you've come to the right place.

Slick Slider is a popular jQuery plugin that allows you to showcase images, videos, and other content in a sleek and interactive manner. Its flexibility and ease of use make it a go-to choice for developers and designers alike. In this tutorial, we'll be focusing on configuring Slick Slider specifically for responsive screens.

With the ever-increasing use of mobile devices and varying screen sizes, it's crucial to ensure that your website or application adapts seamlessly to different devices. By utilizing Slick Slider's responsive mode, we can create a gallery that not only looks great on desktops but also adjusts beautifully on mobile devices, tablets, and everything in between.

Throughout this tutorial, we'll guide you step by step on how to set up and configure Slick Slider for responsive screens. We'll cover topics such as installation, initialization, customization, and optimizing the slider for different breakpoints. By the end of this tutorial, you'll have the knowledge and skills to create your own stunning and responsive image gallery using Slick Slider.

Whether you're a beginner in web development or an experienced coder looking to add a touch of interactivity to your projects, this tutorial is for you. So, let's dive in and discover the power of Slick Slider in responsive mode. Get ready to create an engaging user experience that captivates your audience across all devices!

Responsive Slick Slider

The slick slider can be configured to work responsively as per the screen size. You can manage it to show a different number of slides on different screen sizes. We will see how to do that.

So first of all add these cdn's in your project layout page.

Step 1: Online Cdn of Jquery and Slick

<script type="text/javascript" src="//code.jquery.com/jquery-1.11.0.min.js"></script>
    <script src="https://cdnjs.cloudflare.com/ajax/libs/slick-carousel/1.8.1/slick.min.js"></script>
    <link href="https://cdnjs.cloudflare.com/ajax/libs/slick-carousel/1.8.1/slick.css" rel="stylesheet" />
    <link href="https://cdnjs.cloudflare.com/ajax/libs/slick-carousel/1.8.1/slick-theme.css" rel="stylesheet" />

Step 2: Script For Slick Slider

After adding the CDNs to the layout page we have to add the script to initialize slick in responsive mode. We will add breakdown points in the responsive array and we will mention a number of slides that we want to show for that case.

<script>
        $(document).ready(function () {
            $('.slider').slick({
                slidesToShow: 4,
                slidesToScroll:4,
                dots: true,
                infinite: true,
                cssEase: 'linear',
                arrow: true,
                responsive: [
                    {
                        breakpoint: 1024,
                        settings: {
                            slidesToShow: 3,
                            slidesToScroll: 3,
                            infinite: true,
                            dots: true
                        }
                    },
                    {
                        breakpoint: 600,
                        settings: {
                            slidesToShow: 2,
                            slidesToScroll: 2
                        }
                    },
                    {
                        breakpoint: 480,
                        settings: {
                            slidesToShow: 1,
                            slidesToScroll: 1
                        }
                    }
                ]
            });
        });
    </script>

Step 3: Html Code 

Now we will add some images to our HTML page. Then we will initialize that as a slick slider. You can copy the images from here to show the slider.

<div class="slider">
            <div>
                <img src="http://kenwheeler.github.io/slick/img/fonz1.png" />
            </div>
            <div>
                <img src="http://kenwheeler.github.io/slick/img/fonz2.png" />
            </div>
            <div>
                <img src="http://kenwheeler.github.io/slick/img/fonz3.png" />
            </div>
            <div>
                <img src="http://kenwheeler.github.io/slick/img/fonz1.png" />
            </div>
            <div>
                <img src="http://kenwheeler.github.io/slick/img/fonz2.png" />
            </div>
            <div>
                <img src="http://kenwheeler.github.io/slick/img/fonz3.png" />
            </div>
        </div>

Step 4: Complete the Code Of Html And Script 

This is the complete view that you should have to create your responsive slick slider. You have to remember to put your script in the correct order to make it work. 

@{
    ViewBag.Title = "Home Page";
}
<html>
<head>
    <style>
        .slider {
            width: 650px;
            margin: 0 auto;
        }

        img {
            width: 200px;
            height: 200px;
        }
        .slick-prev:before, .slick-next:before {
            font-family: 'slick';
            font-size: 20px;
            line-height: 1;
            opacity: .75;
            color: gray !important;
            -webkit-font-smoothing: antialiased;
            -moz-osx-font-smoothing: grayscale;
        }
        
    </style>


</head>
<body style="margin-top: 62px !important;">
    <div class="row">
        <div class="slider">
            <div>
                <img src="http://kenwheeler.github.io/slick/img/fonz1.png" />
            </div>
            <div>
                <img src="http://kenwheeler.github.io/slick/img/fonz2.png" />
            </div>
            <div>
                <img src="http://kenwheeler.github.io/slick/img/fonz3.png" />
            </div>
            <div>
                <img src="http://kenwheeler.github.io/slick/img/fonz1.png" />
            </div>
            <div>
                <img src="http://kenwheeler.github.io/slick/img/fonz2.png" />
            </div>
            <div>
                <img src="http://kenwheeler.github.io/slick/img/fonz3.png" />
            </div>
        </div>
    </div>

    <script type="text/javascript" src="//code.jquery.com/jquery-1.11.0.min.js"></script>
    <script src="https://cdnjs.cloudflare.com/ajax/libs/slick-carousel/1.8.1/slick.min.js"></script>
    <link href="https://cdnjs.cloudflare.com/ajax/libs/slick-carousel/1.8.1/slick.css" rel="stylesheet" />
    <link href="https://cdnjs.cloudflare.com/ajax/libs/slick-carousel/1.8.1/slick-theme.css" rel="stylesheet" />
    <script>
        $(document).ready(function () {
            $('.slider').slick({
                slidesToShow: 4,
                slidesToScroll:4,
                dots: true,
                infinite: true,
                cssEase: 'linear',
                arrow: true,
                responsive: [
                    {
                        breakpoint: 1024,
                        settings: {
                            slidesToShow: 3,
                            slidesToScroll: 3,
                            infinite: true,
                            dots: true
                        }
                    },
                    {
                        breakpoint: 600,
                        settings: {
                            slidesToShow: 2,
                            slidesToScroll: 2
                        }
                    },
                    {
                        breakpoint: 480,
                        settings: {
                            slidesToShow: 1,
                            slidesToScroll: 1
                        }
                    }
                ]
            });
        });
    </script>

</body>
</html>

Step 5: Now run the application

Now run your application and you will see a slick slider initialized with 4 slides. Now try to reduce the screen width and you will see at one point it will break down to 3 images and if you keep reducing the width it will start showing 2 slides. 

Responsive Slick Slider
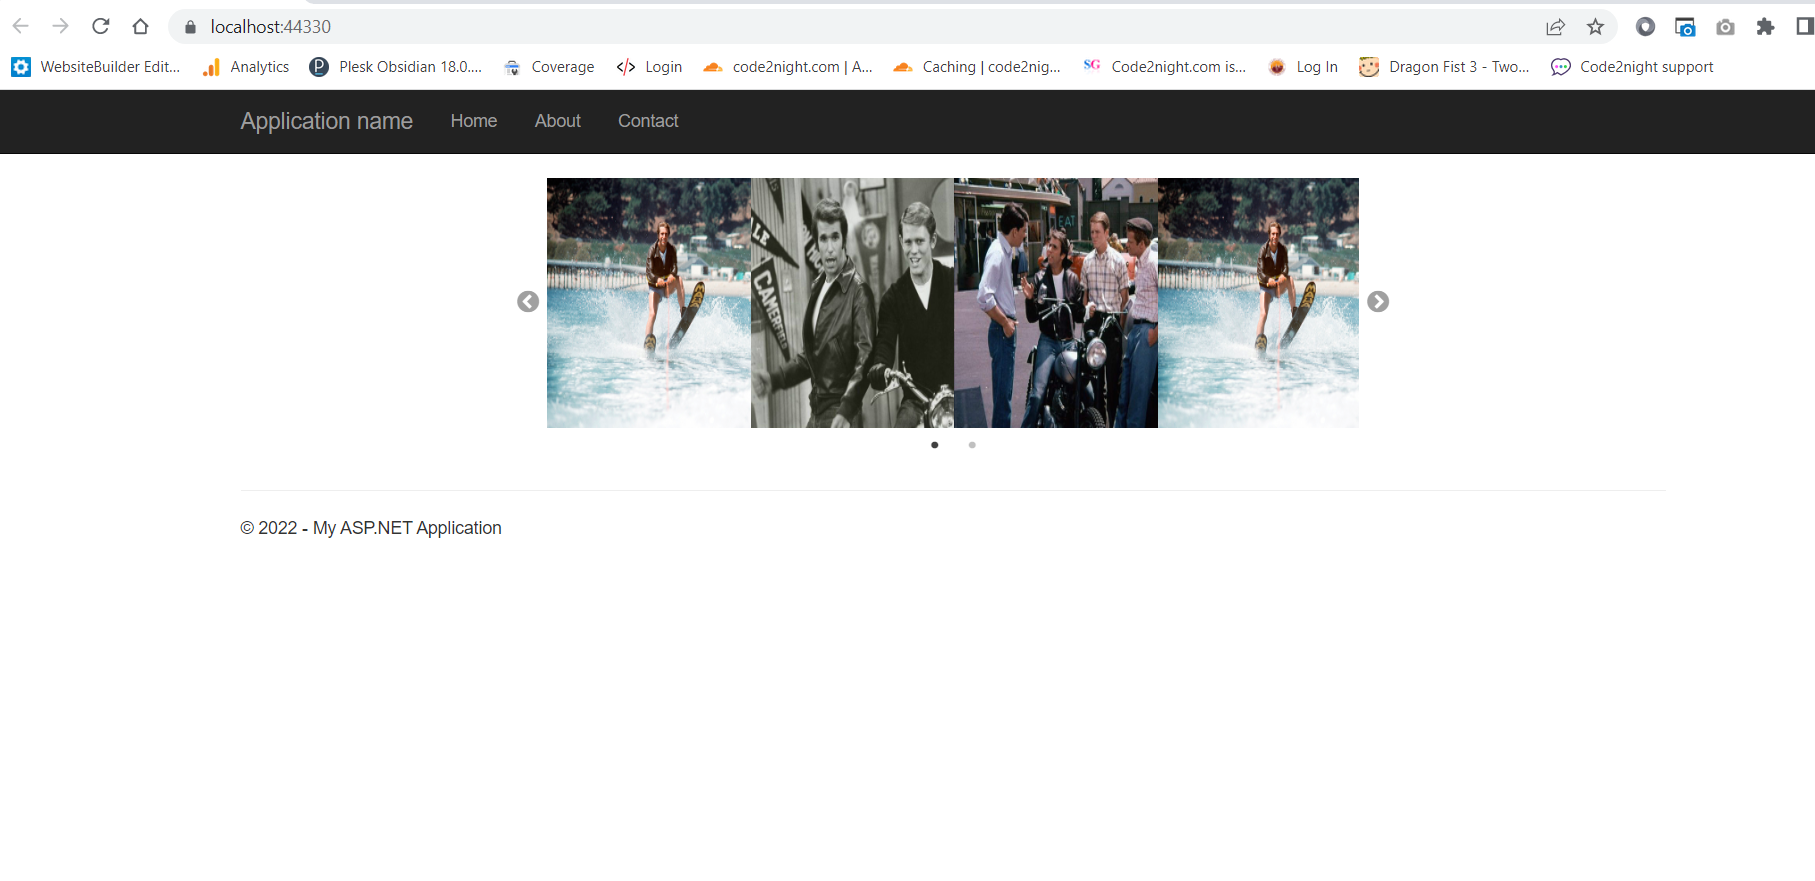
Here we can see 4 slides as the screen is showing up to full width

Responsive Slick Slider

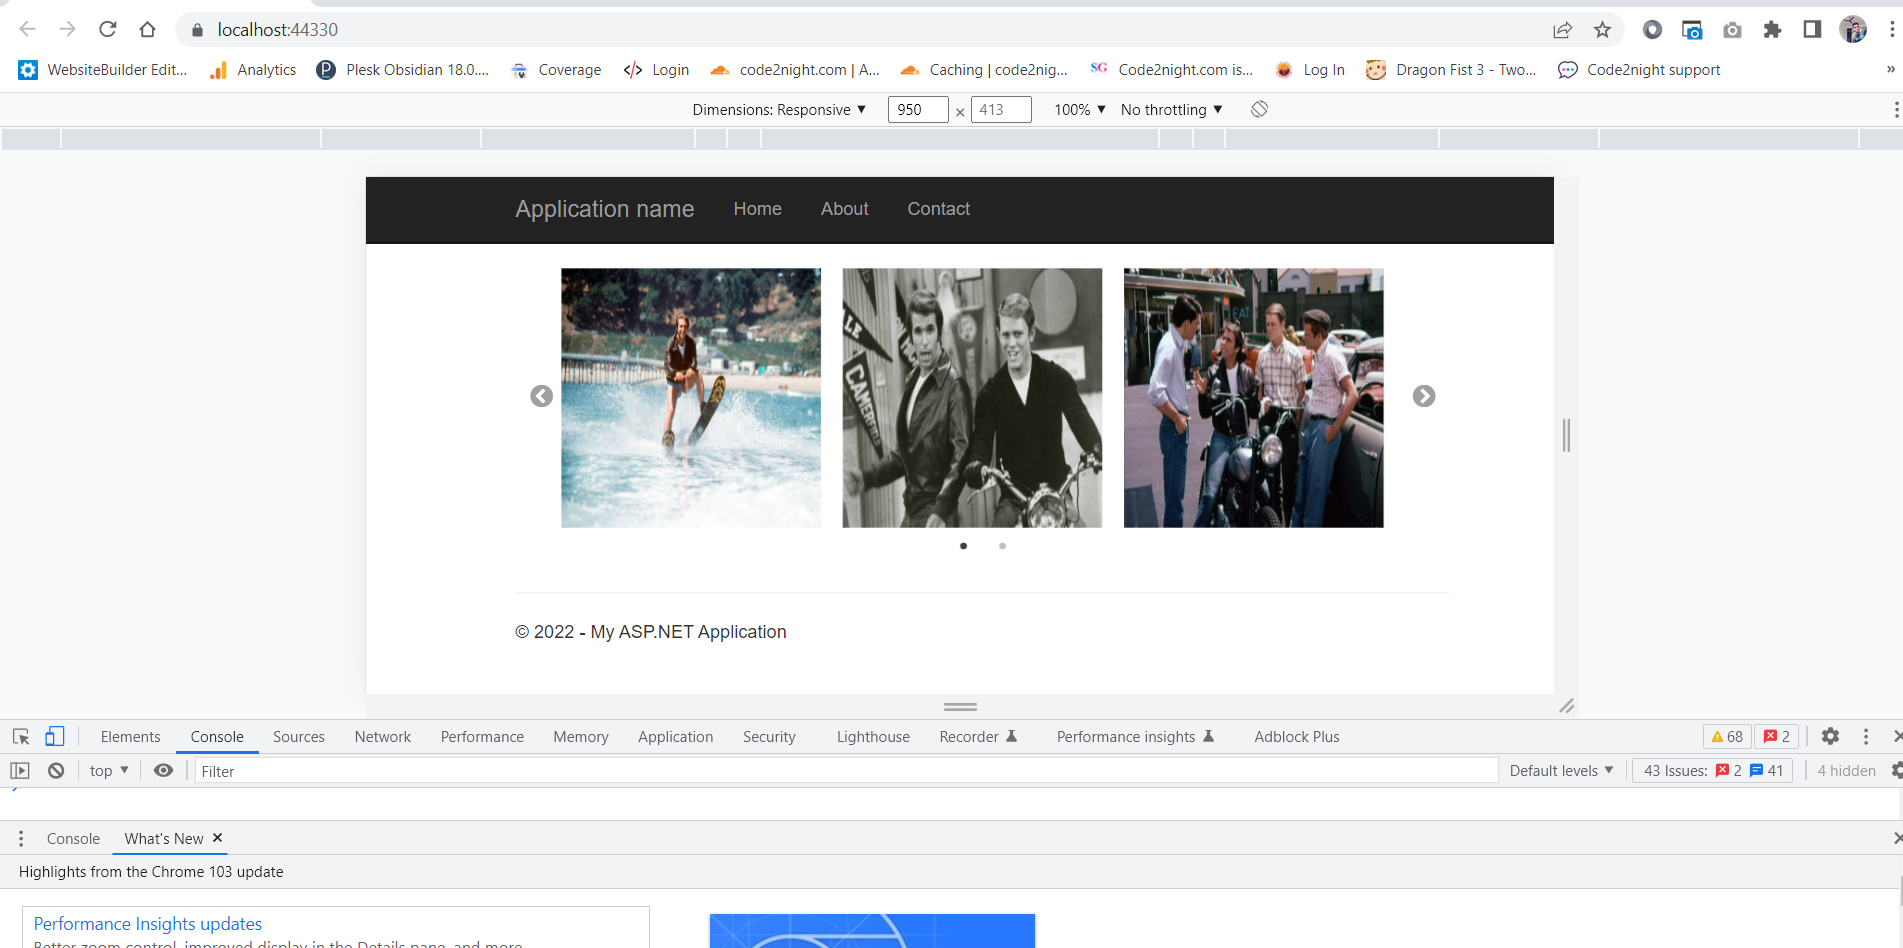
Here you can see 3 slides per screen, as the width is reduced from the full window

Responsive Slick Slider 2

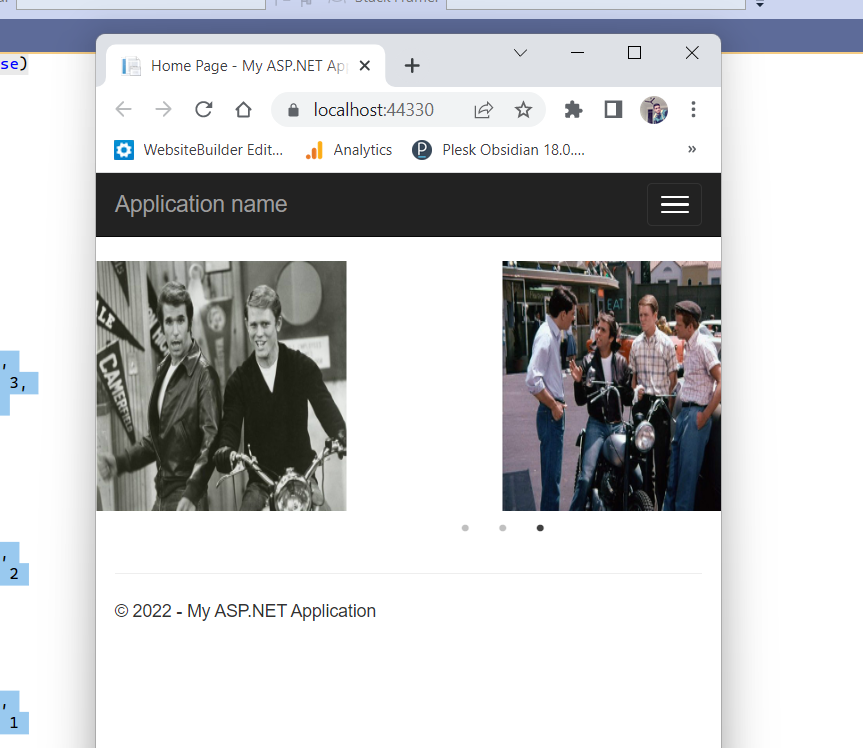
Here you can see 2 images are visible in the slider as the width is reduced to less size.

So you can notice the slider changing its slides as per the device width. So this is how you can create a responsive slick slider in Asp.Net.

S
Shubham Batra
Programming author at Code2Night — sharing tutorials on ASP.NET, C#, and more.
View all posts →

Related Articles

Slick Slider with single slide
May 09, 2021
How to Import CSV in ASP.NET MVC
Feb 02, 2024
How to Use Stored Procedures with Parameters in Dapper
Jan 23, 2024
Repopulating and Reselecting same Row in DevExpress Grid
Jan 19, 2024
Previous in HTML/CSS
Create a Music Player in HTML/CSS: Step-by-Step Guide
Next in HTML/CSS
How to add a WhatsApp share button on a website
Buy me a pizza

Comments

🔥 Trending This Month

  • 1
    HTTP Error 500.32 Failed to load ASP NET Core runtime 6,939 views
  • 2
    Error-An error occurred while processing your request in .… 11,281 views
  • 3
    Comprehensive Guide to Error Handling in Express.js 236 views
  • 4
    ConfigurationBuilder does not contain a definition for Set… 19,464 views
  • 5
    Complete Guide to Creating a Registration Form in HTML/CSS 4,218 views
  • 6
    Mastering Unconditional Statements in C: A Complete Guide … 21,507 views
  • 7
    Mastering JavaScript Error Handling with Try, Catch, and F… 162 views

On this page

🎯

Interview Prep

Ace your HTML/CSS interview with curated Q&As for all levels.

View HTML/CSS Interview Q&As

More in HTML/CSS

  • How to add a WhatsApp share button on a website 19398 views
  • Code syntax higlighter using Prism js 13699 views
  • Create a Music Player in HTML/CSS: Step-by-Step Guide 9445 views
  • How to create a table with fixed header and scrollable body 6465 views
  • Free PHP, HTML, CSS, JavaScript/TypeScript editor - CodeLobs… 4955 views
View all HTML/CSS posts →

Tags

AspNet C# programming AspNet MVC c programming AspNet Core C software development tutorial MVC memory management Paypal coding coding best practices data structures programming tutorial tutorials object oriented programming Slick Slider StripeNet
Free Download for Youtube Subscribers!

First click on Subscribe Now and then subscribe the channel and come back here.
Then Click on "Verify and Download" button for download link

Subscribe Now | 1770
Download
Support Us....!

Please Subscribe to support us

Thank you for Downloading....!

Please Subscribe to support us

Continue with Downloading
Be a Member
Join Us On Whatsapp
Code2Night

A community platform for sharing programming knowledge, tutorials, and blogs. Learn, write, and grow with developers worldwide.

Panipat, Haryana, India
info@code2night.com
Quick Links
  • Home
  • Blog Archive
  • Tutorials
  • About Us
  • Contact
  • Privacy Policy
  • Terms & Conditions
  • Guest Posts
  • SEO Analyzer
Dev Tools
  • JSON Beautifier
  • HTML Beautifier
  • CSS Beautifier
  • JS Beautifier
  • SQL Formatter
  • Diff Checker
  • Regex Tester
  • Markdown to HTML
  • Word Counter
More Tools
  • Password Generator
  • QR Code Generator
  • Hash Generator
  • Base64 Encoder
  • JWT Decoder
  • UUID Generator
  • Image Converter
  • PNG to ICO
  • SEO Analyzer
By Language
  • Angular
  • Angular js
  • ASP.NET
  • Asp.net Core
  • ASP.NET Core, C#
  • ASP.NET MVC
  • ASP.NET Web Forms
  • C
  • C#
  • C#, ASP.NET Core, Dapper
  • C#, ASP.NET Core, Dapper, Entity Framework
  • DotNet
  • General Web Development
  • HTML, CSS
  • HTML/CSS
  • Java
  • JavaScript
  • JavaScript, HTML, CSS
  • JavaScript, Node.js
  • Node.js
  • Python
  • Python 3.11, Pandas, SQL
  • Python 3.11, SQL
  • Python 3.11, SQLAlchemy
  • Python 3.11, SQLAlchemy, SQL
  • Python 3.11, SQLite
  • React
  • Security
  • SQL Server
  • TypeScript
© 2026 Code2Night. All Rights Reserved.
Made with for developers  |  Privacy  ·  Terms
Translate Page
We use cookies to improve your experience and analyze site traffic. By clicking Accept, you consent to our use of cookies. Privacy Policy
Accessibility
Text size
High contrast
Grayscale
Dyslexia font
Highlight links
Pause animations
Large cursor