How to Build a Web API in ASP.NET Core: Step-by-Step
Web Api in Asp.Net Core
First of all , for creating web api's in asp.net core you have to take one new project based on Asp.Net core MVC 3.1. Now after taking the new project we will add one new api controller and add following code there
namespace RedisCache.Models
{
    public class Product
    {
        public int ProductID { get; set; }

        public string ProductCategory{ get; set; }

        public string SubCategory { get; set; }

        public string ProductName { get; set; }

        public string ProductDescription { get; set; }

        public decimal ProductPrice { get; set; }

        public decimal ProductWeight { get; set; }

        public int Units { get; set; }

        public decimal Total { get; set; }

    }
}
First of all we have to add this model in our project as we are using Entity framework core.
Now after adding the model we can create api's in our project using entity framework. You can copy following code
using Microsoft.AspNetCore.Http;
using Microsoft.AspNetCore.Mvc;
using Microsoft.EntityFrameworkCore;
using Microsoft.Extensions.Caching.Distributed;
using Newtonsoft.Json;
using RedisCache.Models;
using System;
using System.Collections.Generic;
using System.Text;
using System.Threading.Tasks;

namespace RedisCache.Controllers
{

    [ApiController]
    public class ProductController : ControllerBase
    {
        private readonly DbEmployeeContext _context;


        public ProductController(DbEmployeeContext context)
        {
            _context = context;

        }

        [HttpGet]
        [Route("api/Product/GetAll")]
        public async Task<IActionResult> GetAll()
        {
            var products = await _context.Products.ToListAsync();

            return Ok(products);
        }

        [HttpPost]
        [Route("api/Product/Create")]
        public async Task<IActionResult> Create(Product product)
        {
            var result= _context.Products.Add(product);
            _context.SaveChanges();
            return Ok(product);
        }

        [HttpPut]
        [Route("api/Product/Update")]
        public async Task<IActionResult> Update(Product product)
        {

                var existingProduct =await _context.Products.FirstOrDefaultAsync(x=>x.ProductID==product.ProductID);

                if (existingProduct != null)
                {
                    existingProduct.ProductName = product.ProductName;
                    existingProduct.ProductDescription = product.ProductDescription;
                    existingProduct.ProductCategory = product.ProductCategory;
                    existingProduct.SubCategory = product.SubCategory;
                    _context.SaveChanges();
                }
                else
                {
                    return NotFound();
                }


            return Ok("Success");
        }
        [HttpDelete]
        [Route("api/Product/Delete")]
        public async Task<IActionResult> Delete(int id)
        {

            var existingStudent = await _context.Products.FirstOrDefaultAsync(x => x.ProductID == id);

            _context.Entry(existingStudent).State = EntityState.Deleted;
           _context.SaveChanges();

            return Ok("Record Deleted");
        }

    }
}
Here we are using entity framework for performing crud operation. So here you will see different type of api's created. We will discuss them one by one
HttpGet - So the first api we will create is GetAll . This api is basically for getting the list of data from the database. Here we have used a database which has Product table in it.
[HttpGet]
[Route("api/Product/GetAll")]
public async Task<IActionResult> GetAll()
{
     var products = await _context.Products.ToListAsync();
    return Ok(products);
}
So , for testing this api we will use postman. You can download postman and there we have to call the url like this .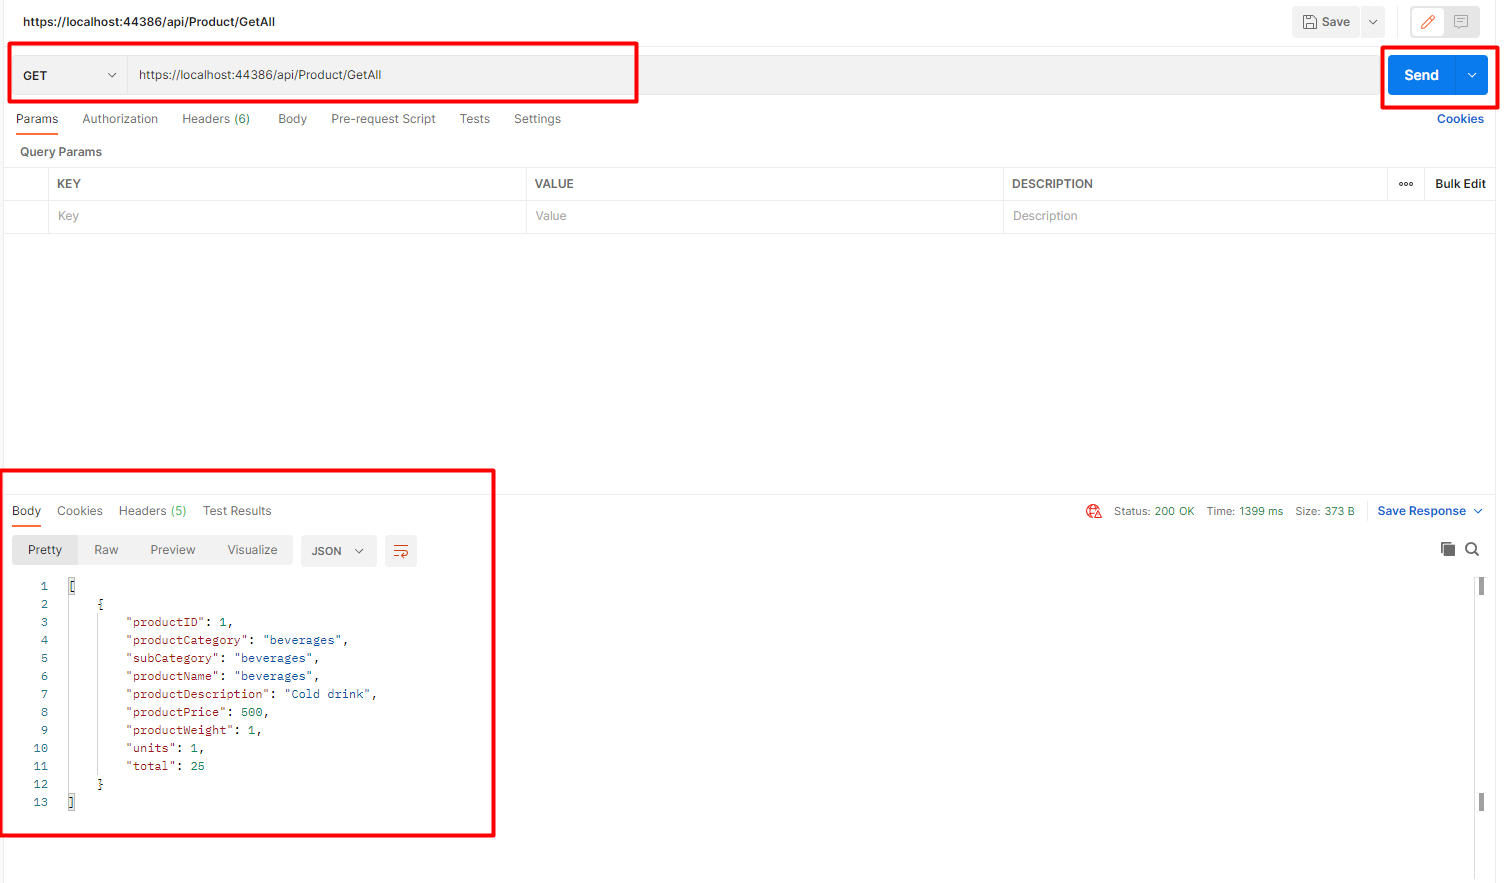
So, here you can see the list of Products returned back in the response. Make sure to use Get for a api of type HttpGet.
HttpPost - Now we will create HttpPost api for create operation. You can copy the code from below
[HttpPost]
[Route("api/Product/Create")]
public async Task<IActionResult> Create(Product product)
{
     var result= _context.Products.Add(product);
     _context.SaveChanges();
     return Ok(product);
}
So, we will call the Create api by passing the object as json in postman. You can have a look at the image below
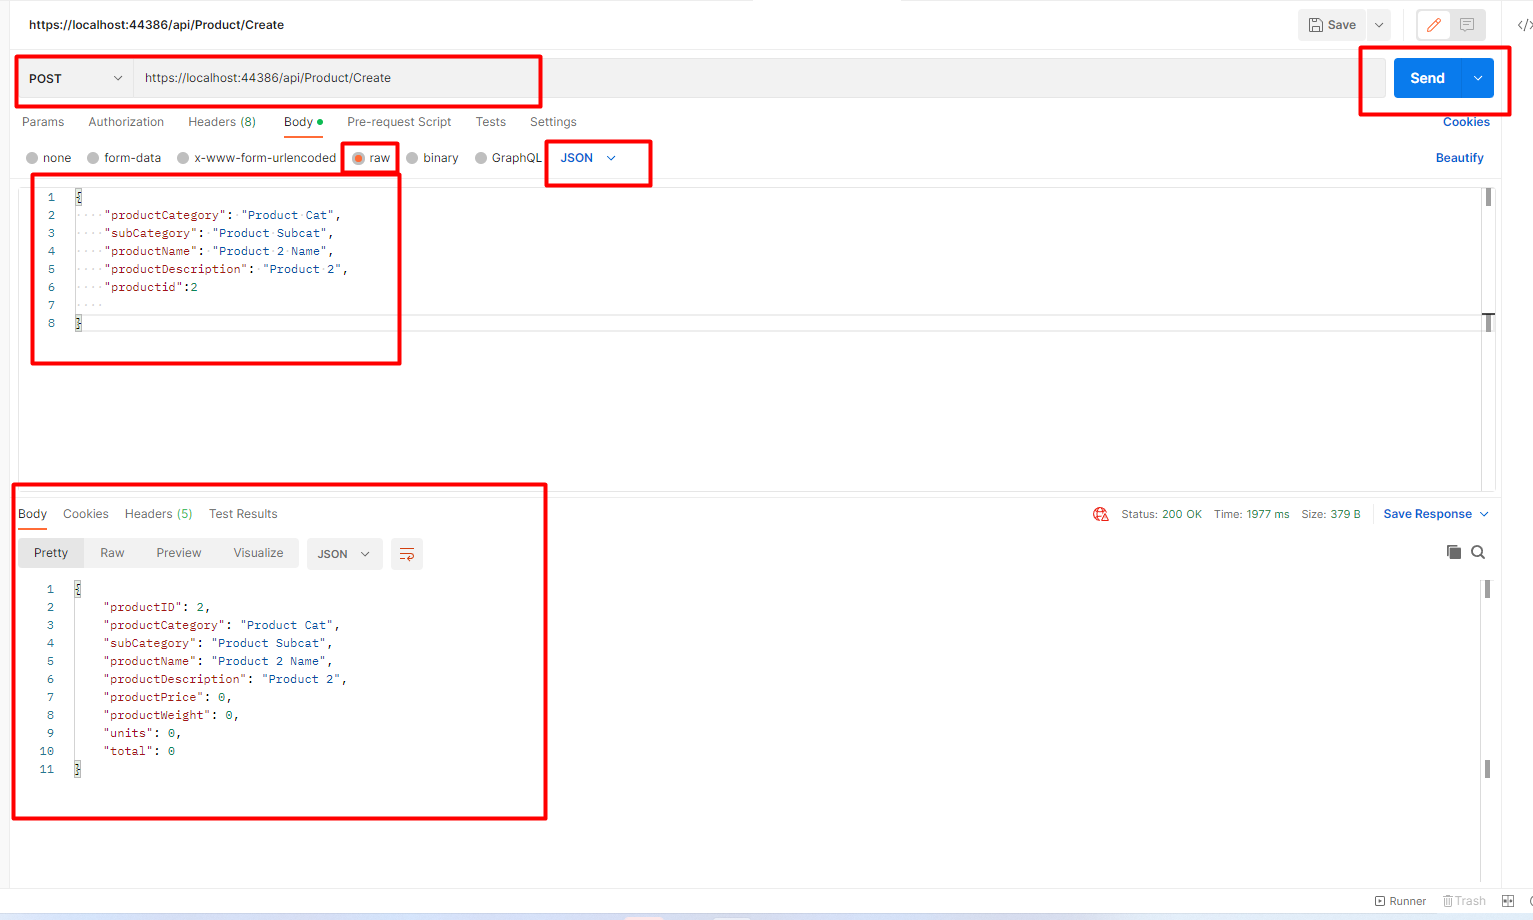
This will add one new record in the database.You have to use HttpPost for create operations.
HttpPut- Now we will have a look at HttpPut api which is for update operations. You can create an update api like this.
[HttpPut]
[Route("api/Product/Update")]
public async Task<IActionResult> Update(Product product)
{

        var existingProduct =await _context.Products.FirstOrDefaultAsync(x=>x.ProductID==product.ProductID);

        if (existingProduct != null)
        {
            existingProduct.ProductName = product.ProductName;
            existingProduct.ProductDescription = product.ProductDescription;
            existingProduct.ProductCategory = product.ProductCategory;
            existingProduct.SubCategory = product.SubCategory;
            _context.SaveChanges();
        }
        else
        {
            return NotFound();
        }


    return Ok("Success");
}
So, for calling the api we will use this
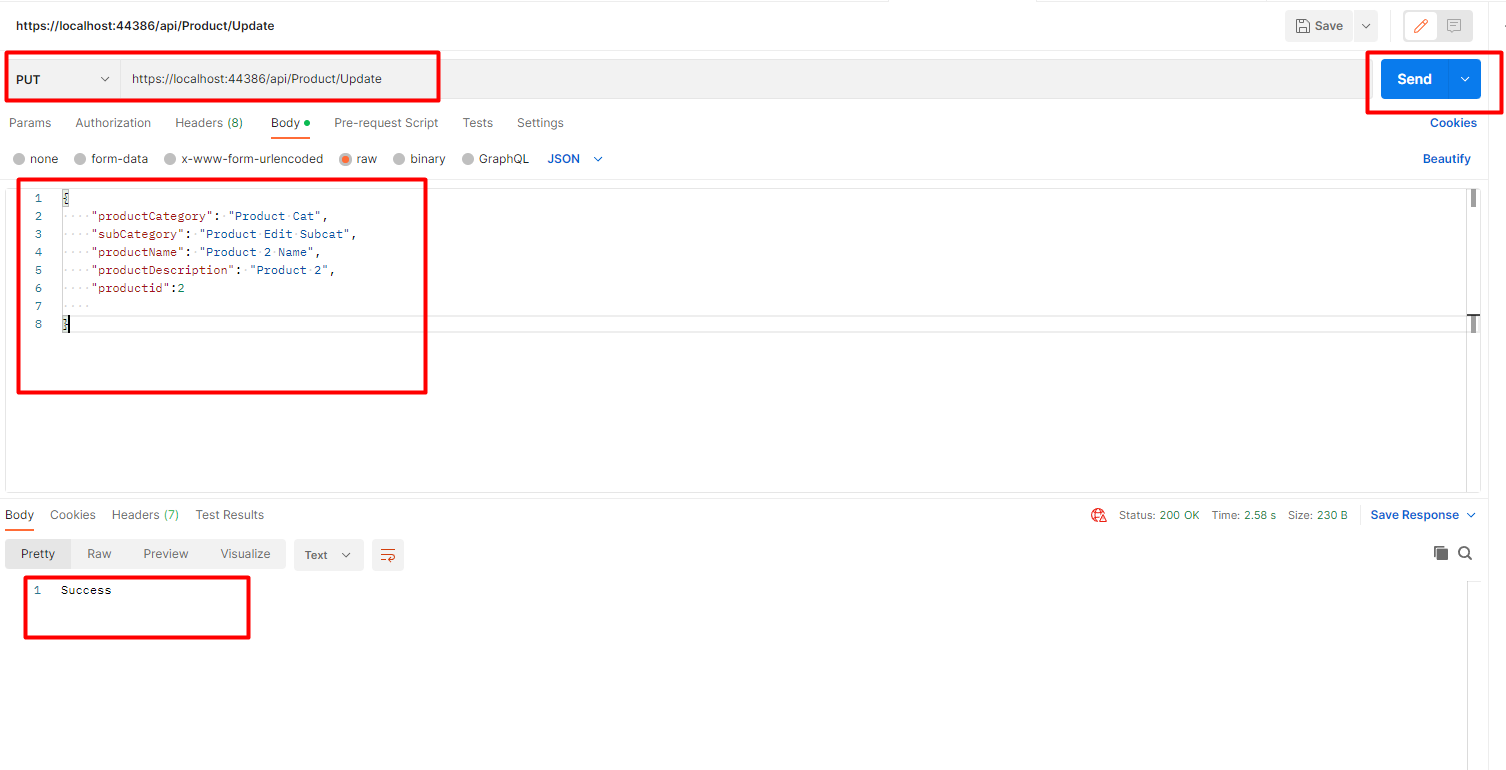 Here, you have to make sure you choose Put here in the postman as we are using HttpPut api.
HttpDelete - For delete operation we often use HttpDelete api. You can copy the delete api from here
[HttpDelete]
[Route("api/Product/Delete")]
public async Task<IActionResult> Delete(int id)
{

    var existingStudent = await _context.Products.FirstOrDefaultAsync(x => x.ProductID == id);

    _context.Entry(existingStudent).State = EntityState.Deleted;
   _context.SaveChanges();

    return Ok("Record Deleted");
}
For calling the api we have to do this in postman
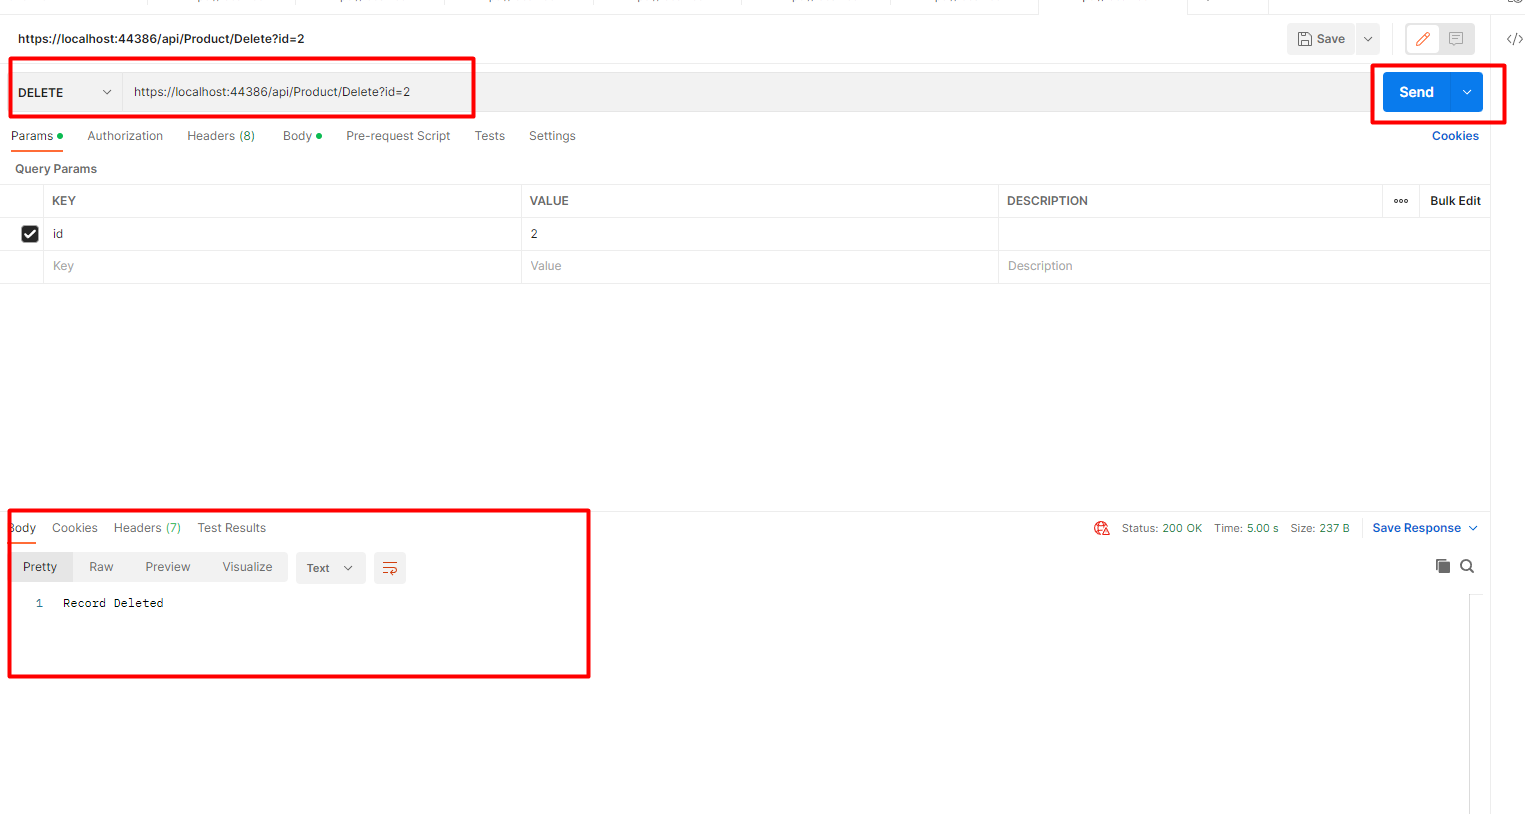 So , this is how we can delete the record using HttpDelete Api.
This is how we can create Web Api in Asp.net core.
