
Login With Github in Asp.net MVC
Hello guys, welcome to Code2Night! In this blog post, we will be Integrating GitHub login in an ASP.NET MVC application. We will go through step-by-step instructions on how to set up the GitHub OAuth application, configure our ASP.NET MVC application to handle Github authentication, and finally, test the authentication flow.
As web developers, we often need to implement social login in our web applications to provide a convenient authentication mechanism for our users. Among the popular social logins, GitHub login has gained a lot of popularity in recent years.
So, if you are looking to implement GitHub login in your ASP.NET MVC application, keep reading and let's get started!
GitHub Authentication
To allow users to log in to your C# application using their GitHub credentials, you can use the OAuth 2.0 authentication flow and the GitHub API. Here's how to implement GitHub login in C#
So the first step is always to create one GitHub client id and client secret to use the authentication. So we have to follow the steps mentioned below
Step 1- Login into your Github Account
Create a new OAuth application in your GitHub account by going to your account settings, selecting "Developer settings" from the sidebar, and then "OAuth Apps". Click the "New OAuth App" button and fill out the form with your application's details. Make sure to specify a callback URL that your application will redirect to after authentication. Check below screenshots
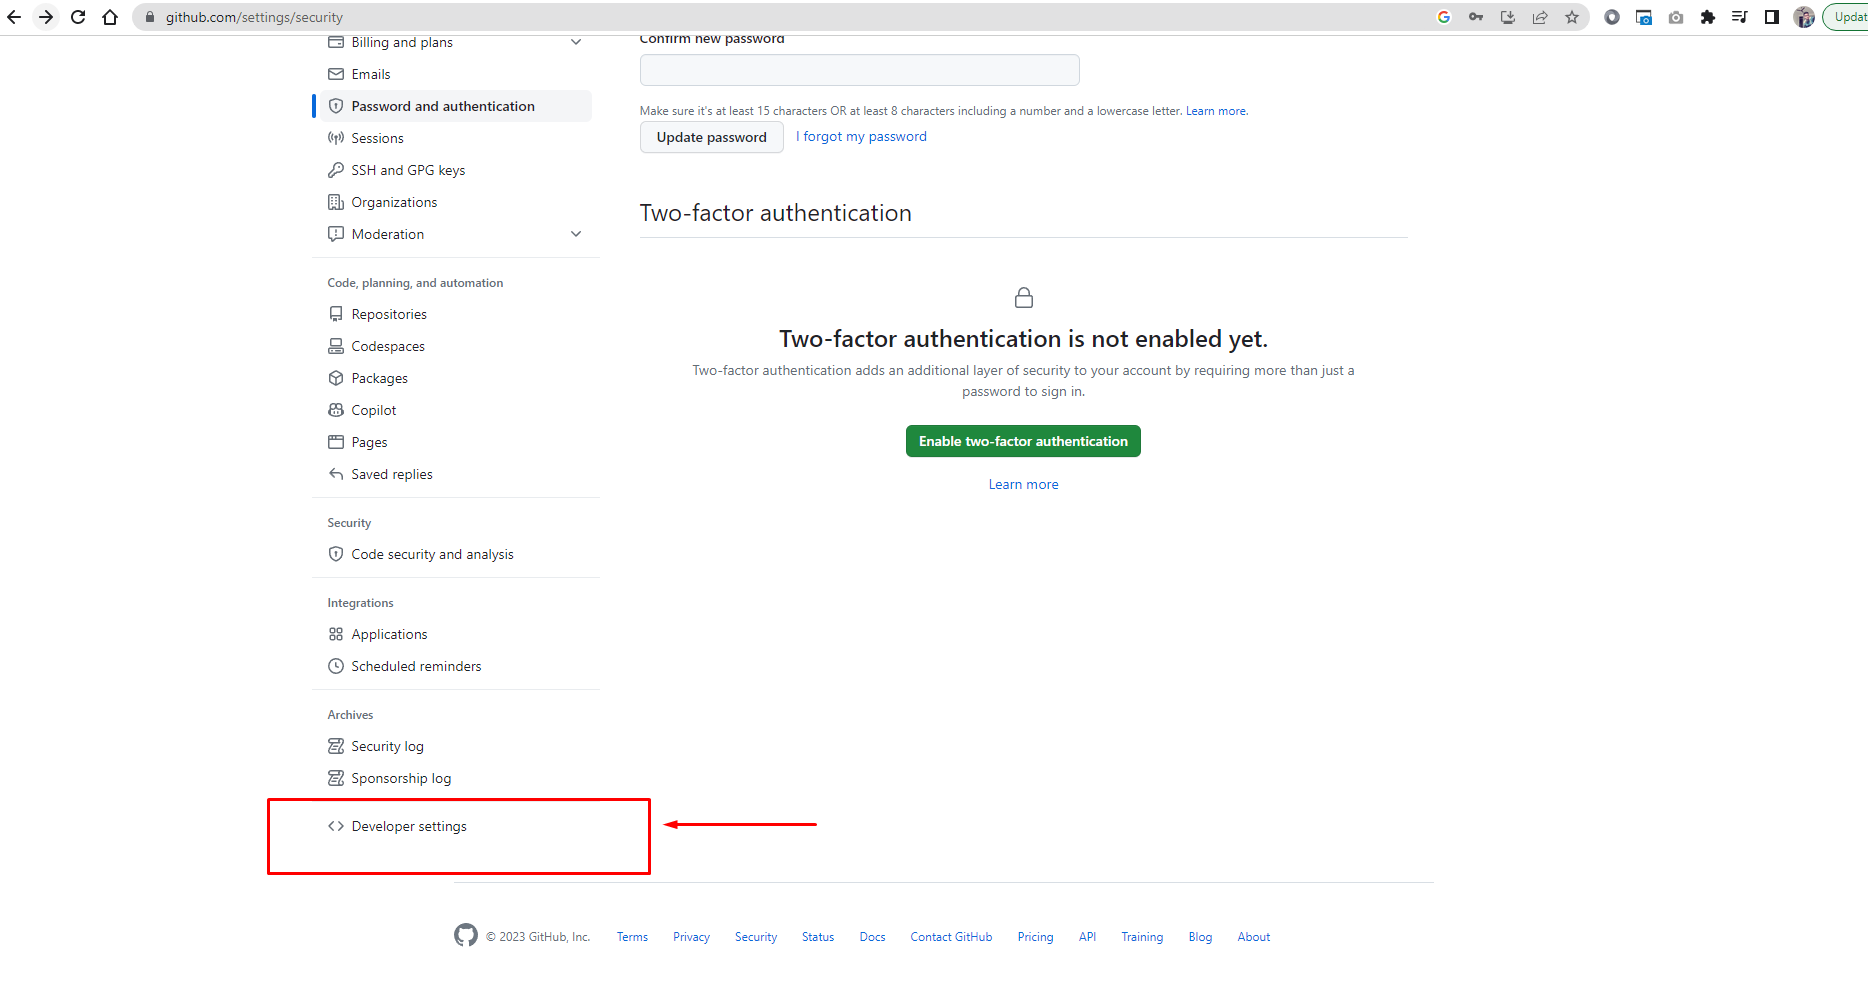
After Login into your account, you have to go to settings and you will see this screen. Here click on Developer Settings as highlighted
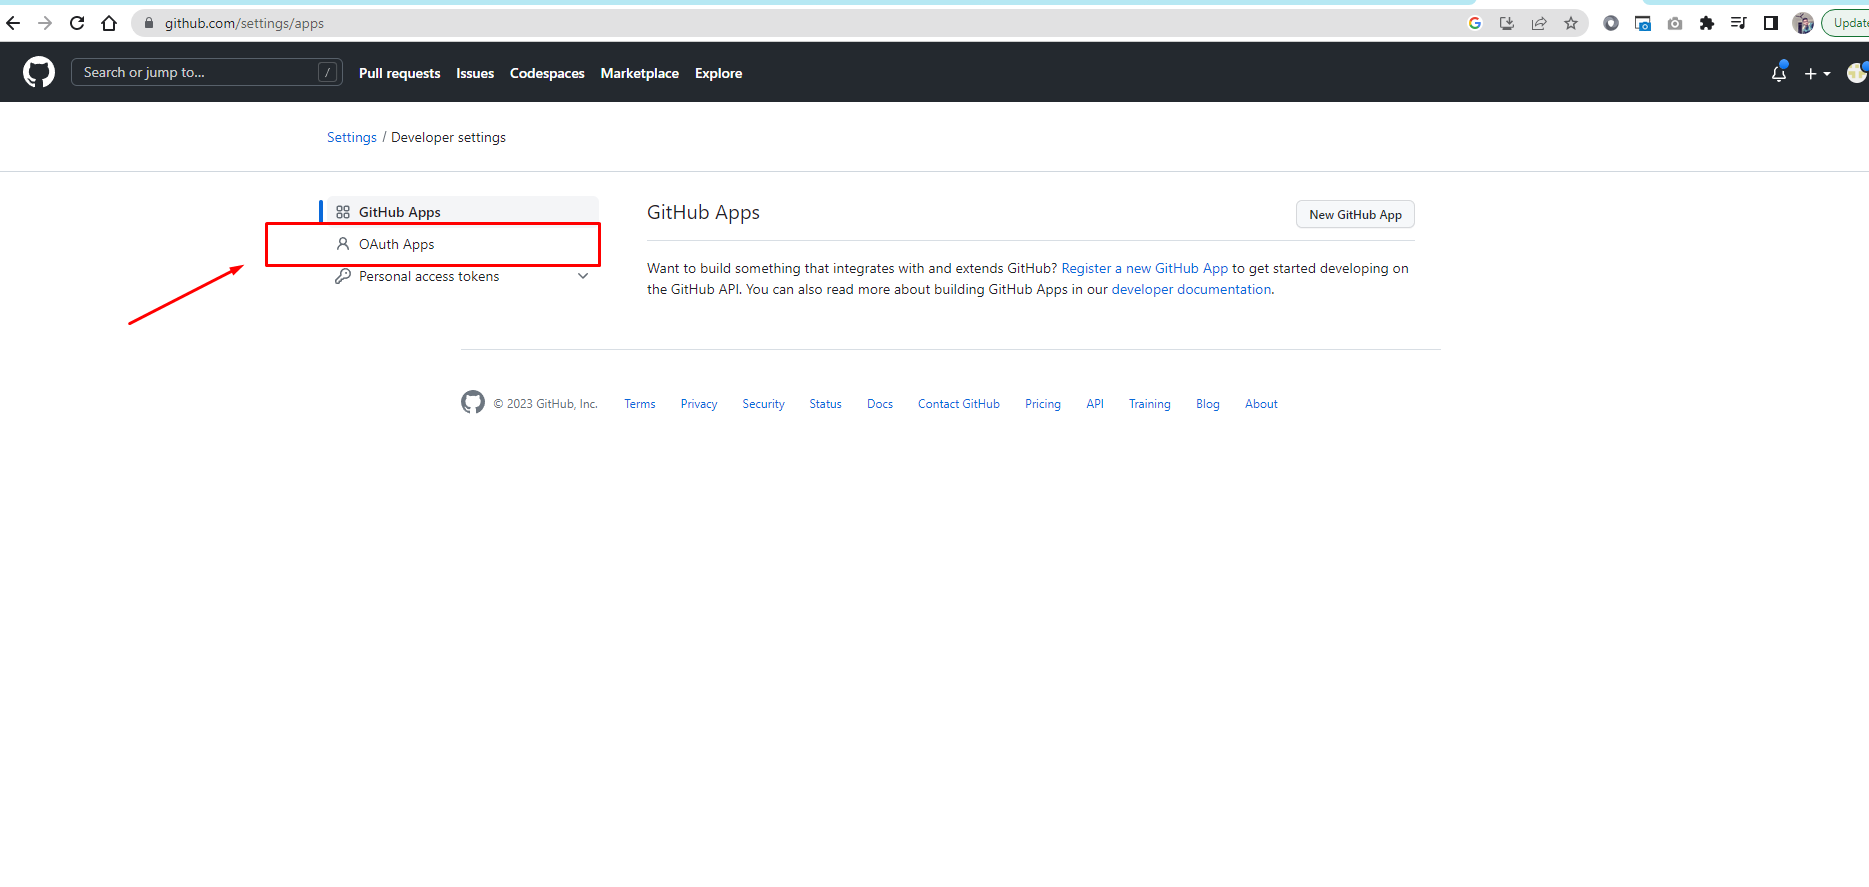
Step 2- Go to Oauth Apps
In the developer settings, click on "OAuth Apps" like in the screenshot below
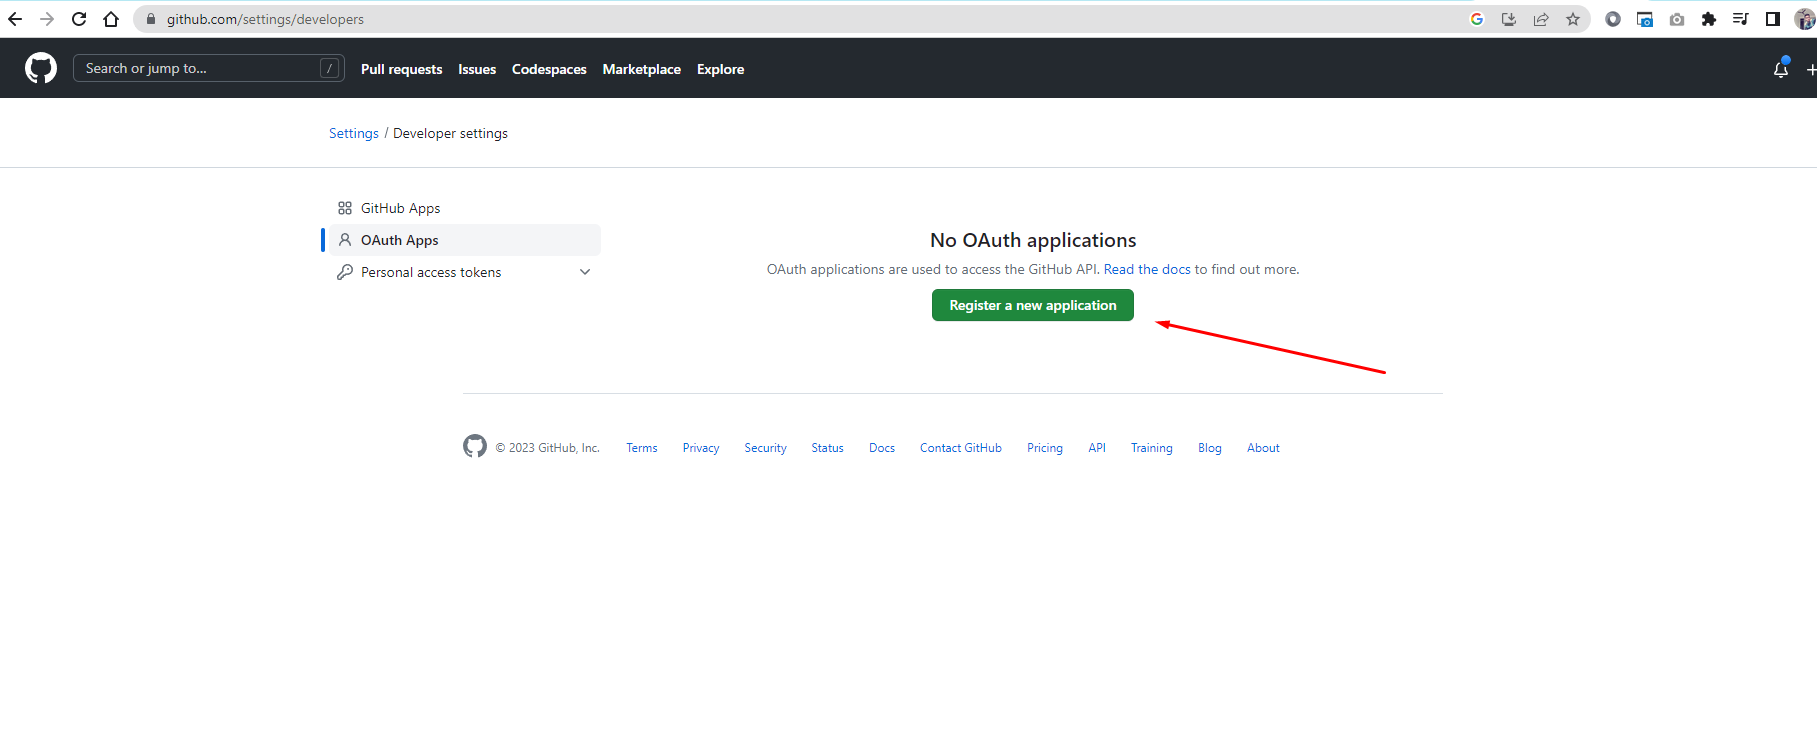
Step 3- Register a New Application
We have to register a new application to obtain the client id and client secret. You can fill in the details in the following manner and make sure you have the correct callback URL. Now click on Register a new application
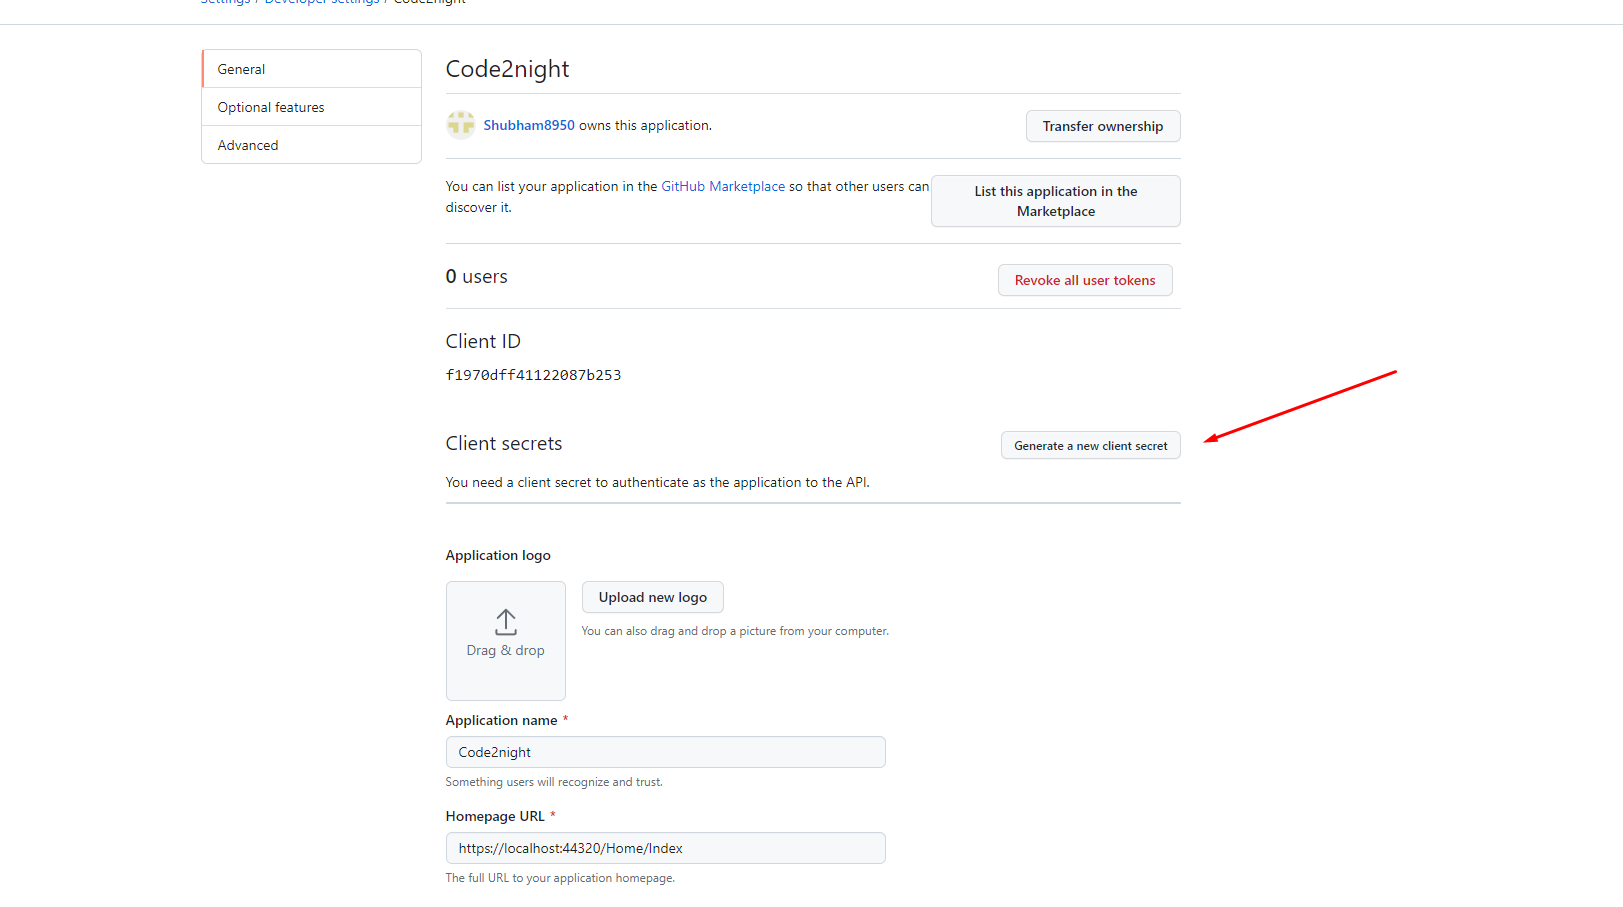
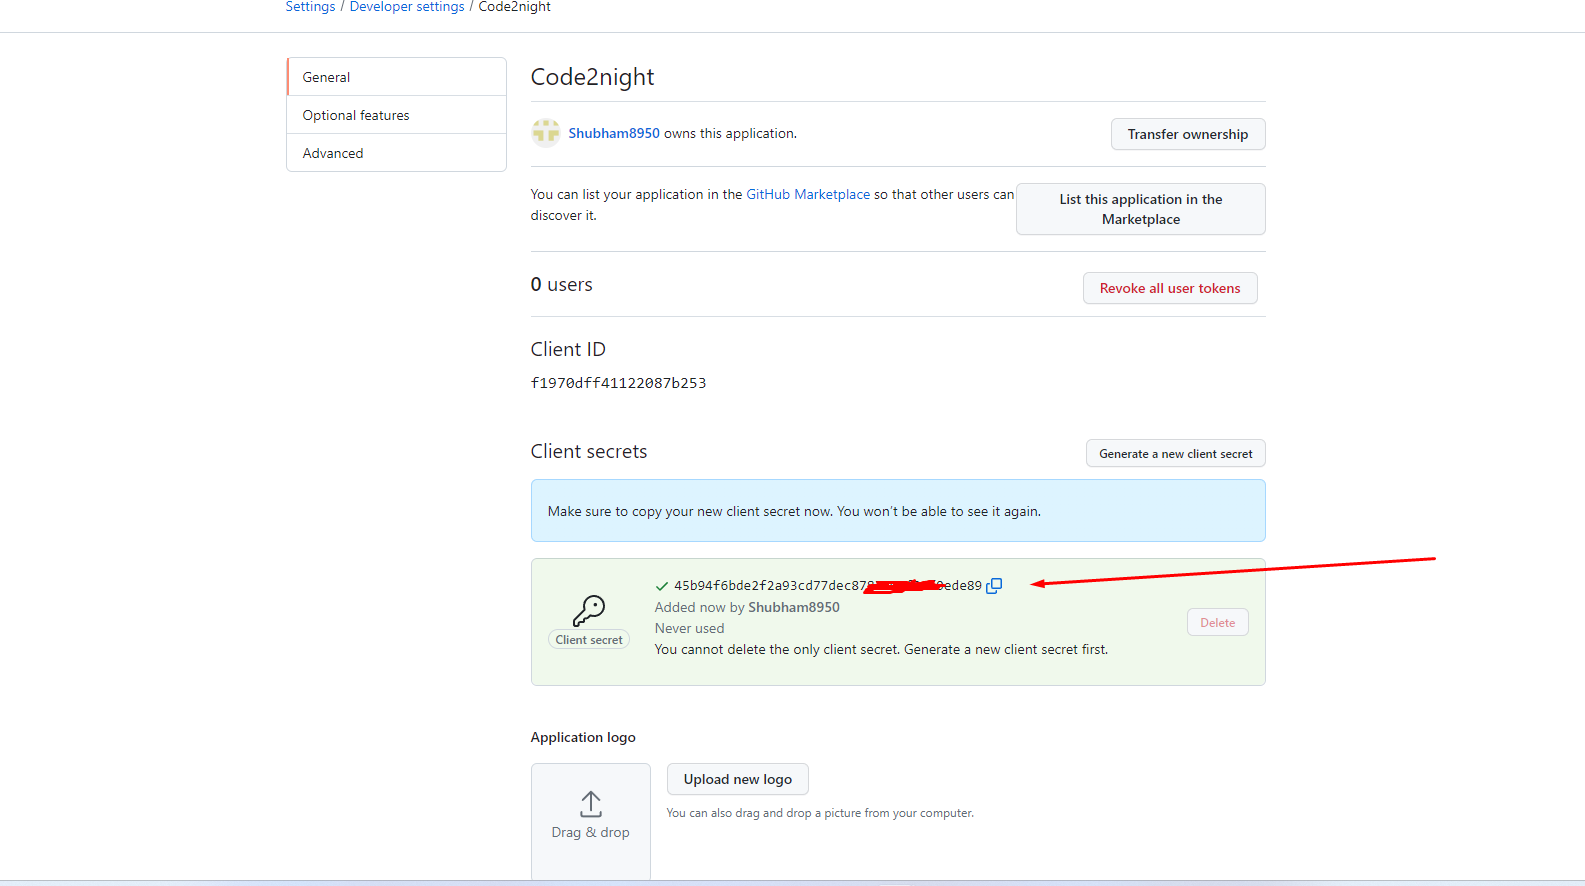
Step 4- Generate the Client's Secret
Now the most important part is to generate the client's secret. So you have to click on the button shown in the screenshot below and then copy the client id and client secret
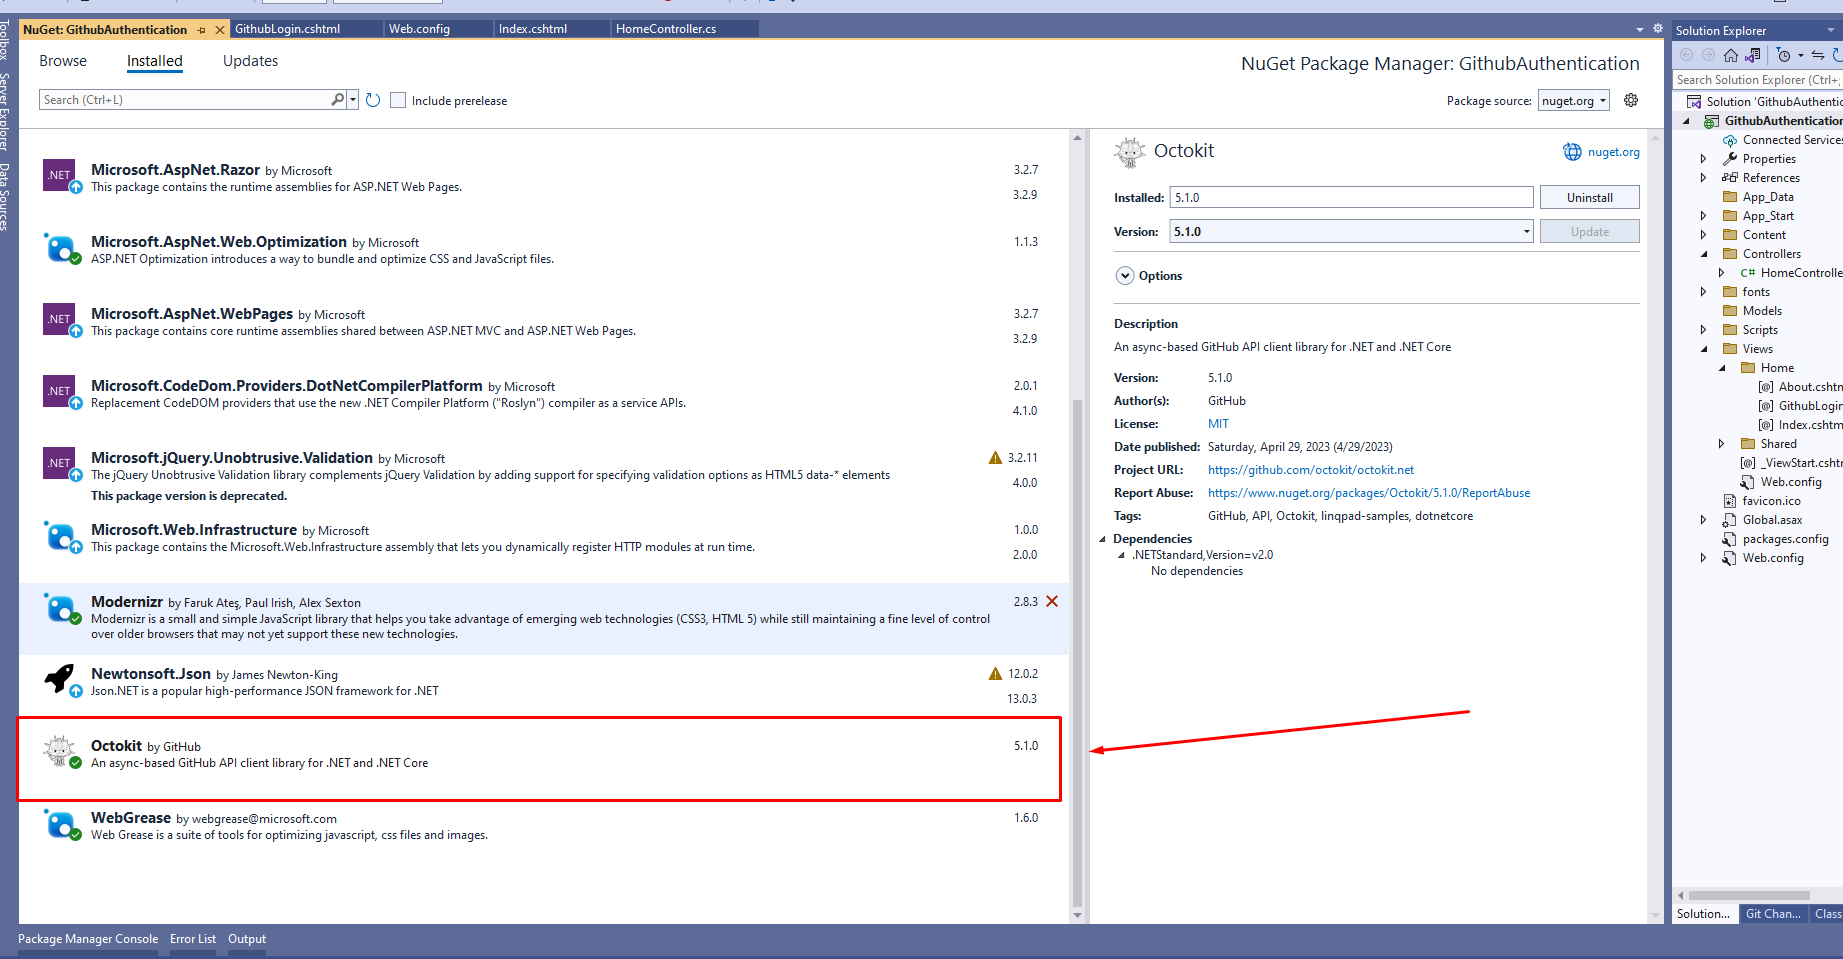
Now we have the client id and client secret from the step above. Now we can go to our Asp.net application and first of all, we have to install the Octokit Nuget package.
After you have installed this package, go to your application controller and add the following namespace
using Octokit;
Now we have to go to the web. config and add the following keys there
<add key="GithubClientId" value="f1970dff4567087b253" />
	<add key="GithubClientSecret" value="b2df2efe65e677116123345b3f589456343163f1" />
	<add key="RedirectUri" value="https://localhost:44320/Home/GithubLogin" />
Now we have to go to the action and get these keys from web config and pass those to view bag to go to the view
public async Task<ActionResult> Index()
{
ViewBag.ClientId = ConfigurationManager.AppSettings["GithubClientId"].ToString();
ViewBag.RedirectUrl = ConfigurationManager.AppSettings["RedirectUri"].ToString();
return View();
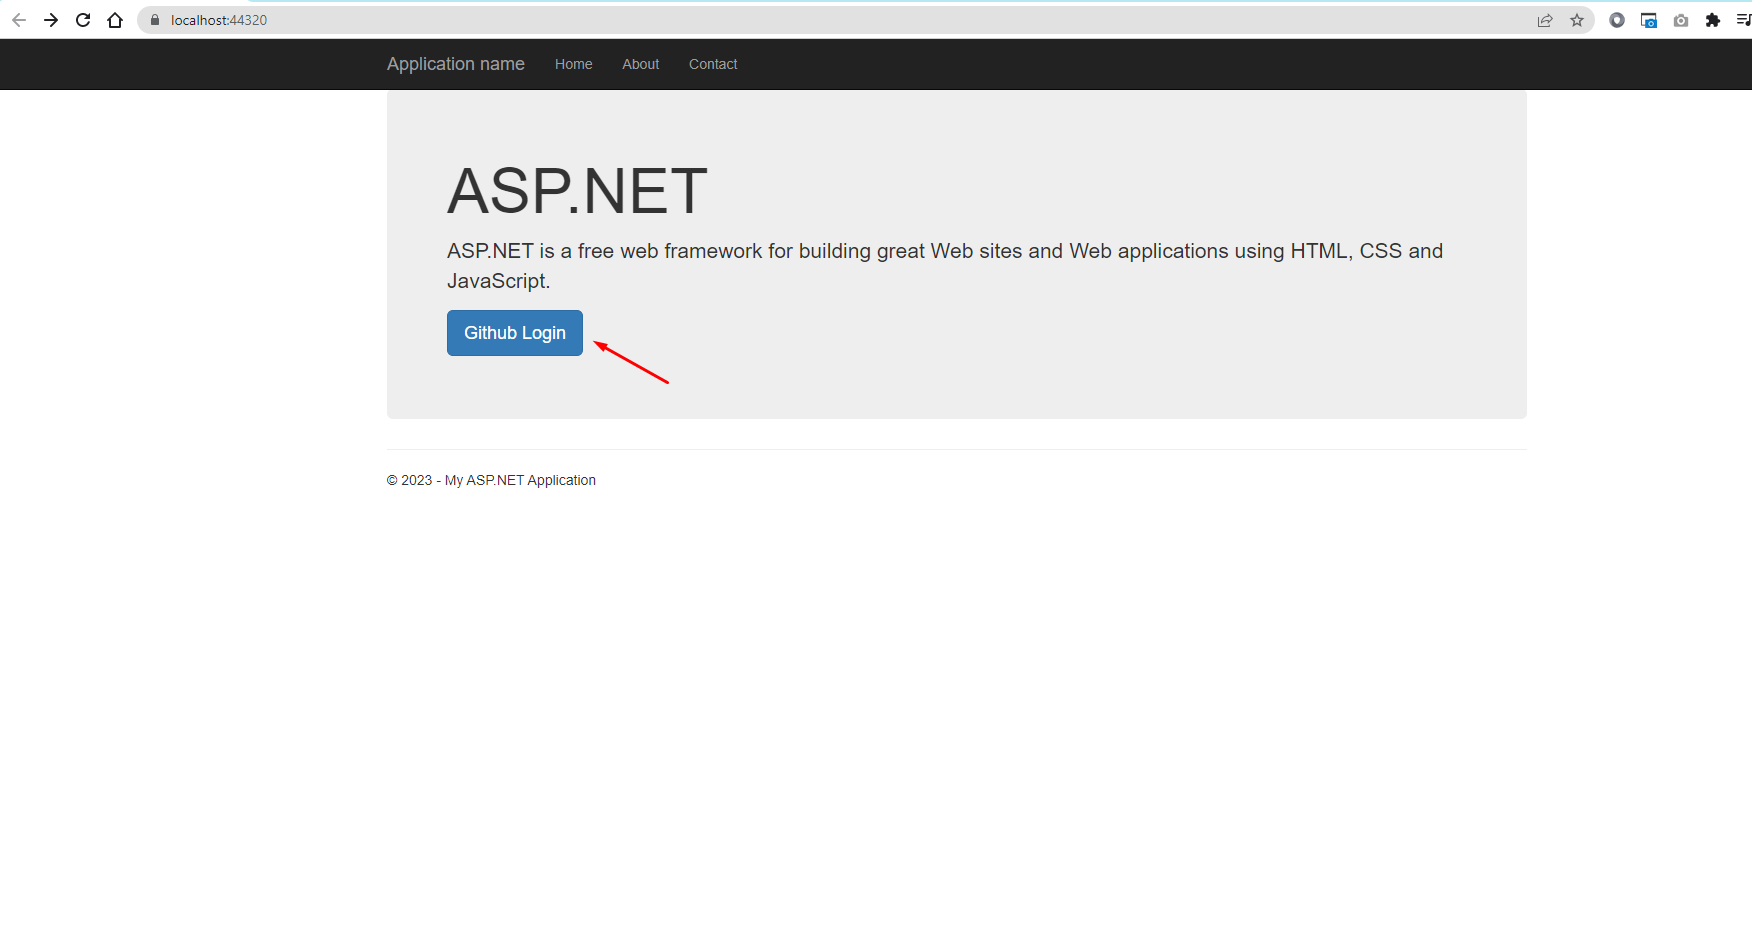
}Now we have to go to the view and add an anchor tag that will act like login with GitHub button you have to add the following in the view
<div class="jumbotron">
    <h1>ASP.NET Github Login</h1>

    <p><a href="https://github.com/login/oauth/authorize?client_id=@ViewBag.ClientId&redirect_uri=@ViewBag.RedirectUrl&scope=user:email" class="btn btn-primary btn-lg">Github Login</a></p>
</div>
Now that we have done adding the button when you will click on this it will redirect to GitHub for authentication, and after authentication, it will return back the authorization code on the redirect URI that you have mentioned on the button. So we have to create the following action for handling callback
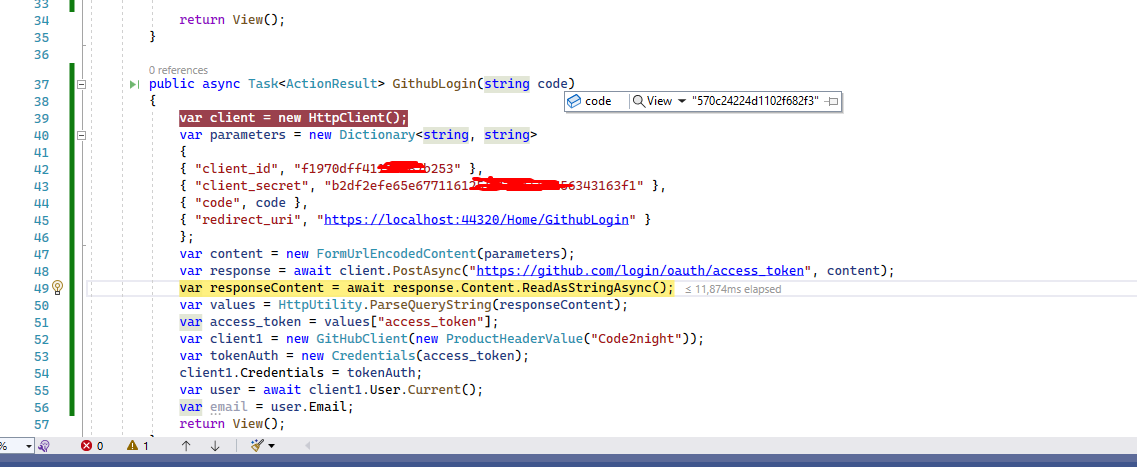
public async Task<ActionResult> GithubLogin(string code)
{
var client = new HttpClient();
var parameters = new Dictionary<string, string>
{
{ "client_id", ConfigurationManager.AppSettings["GithubClientId"].ToString() },
{ "client_secret", ConfigurationManager.AppSettings["GithubClientSecret"].ToString()},
{ "code", code },
{ "redirect_uri", ConfigurationManager.AppSettings["RedirectUri"].ToString()}
};
var content = new FormUrlEncodedContent(parameters);
var response = await client.PostAsync("https://github.com/login/oauth/access_token", content);
var responseContent = await response.Content.ReadAsStringAsync();
var values = HttpUtility.ParseQueryString(responseContent);
var access_token = values["access_token"];
var client1 = new GitHubClient(new ProductHeaderValue("Code2night"));
var tokenAuth = new Credentials(access_token);
client1.Credentials = tokenAuth;
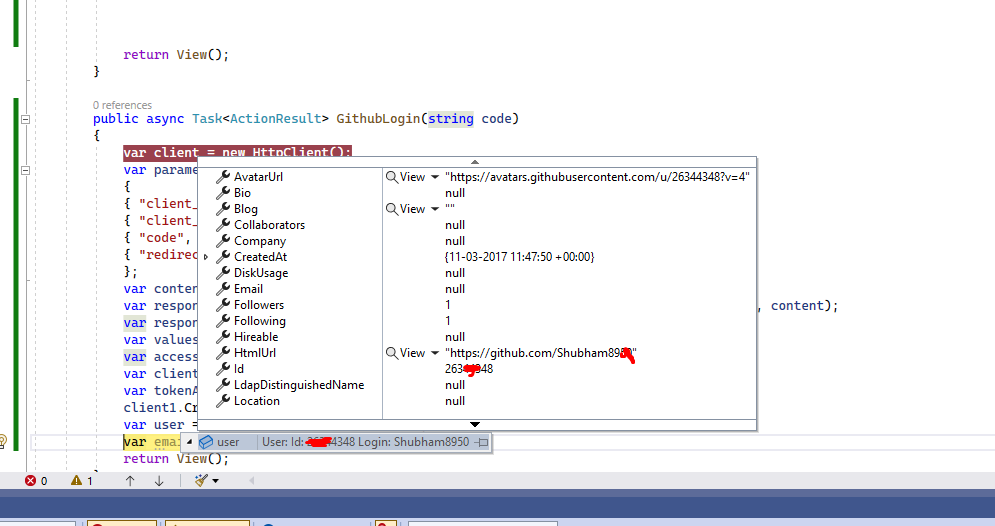
var user = await client1.User.Current();
var email = user.Email;
return View(user);
}Now, in the above action, we are getting the code from the callback and using that to generate an access token and then we using Octokit to use that token and get the user details. Now you can add one new view with the name GithubLogin.cshtml and add the following code
@model Octokit.User
@{
    ViewBag.Title = "Contact";
}
<h2>@(Model.Login)</h2>
Now run the application and you will see the following screen
 Now click on GitHub login button and it will redirect to another screen where you have to add username and password and after correct credentials, you will see the following screen
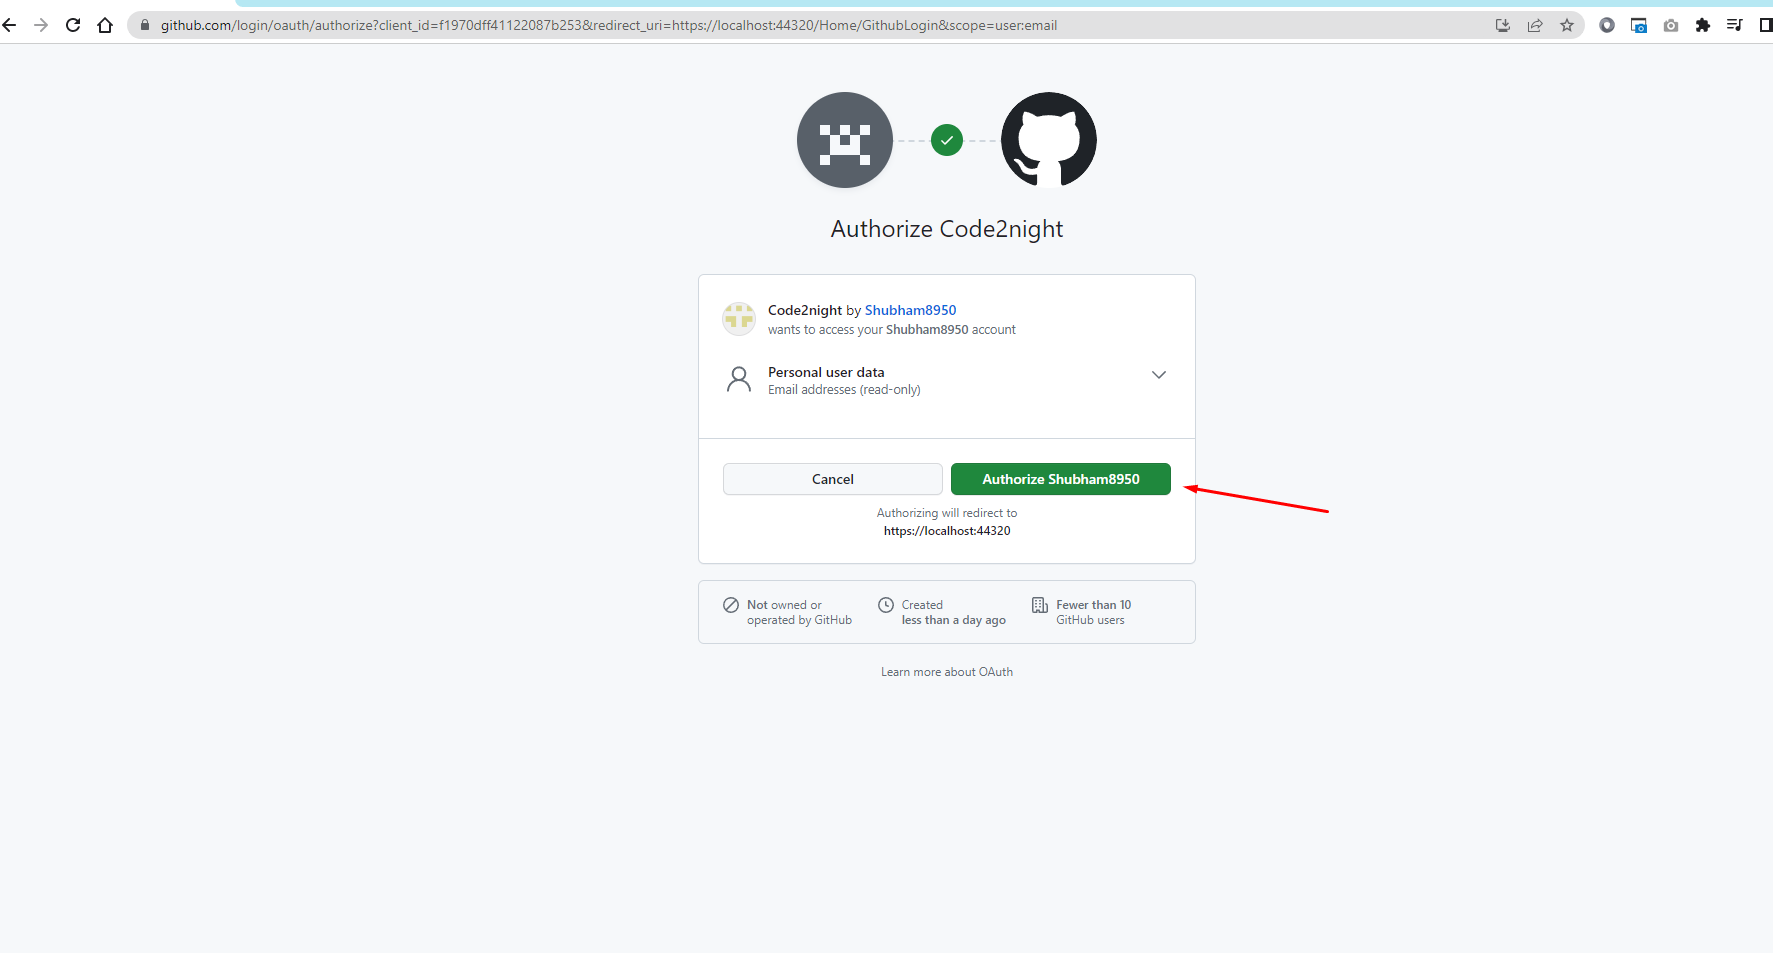
After the user authorizes your application, GitHub will redirect them back to your callback URL with an authorization code.
This code sends a POST request to GitHub's access token endpoint to exchange the authorization code for an access token. The access token can then be used to make requests to the GitHub API on behalf of the user.
and in the user variable you will be able to see the user details
So, this is how we can implement Github Authentication or Login With Github in our Asp.Net MVC project.
