
Integrating Google reCAPTCHA Validation in ASP.NET MVC
Integrating Google reCAPTCHA in ASP.NET MVC
Introduction:
In today's digital landscape, security is paramount for any web application. One effective way to enhance security and protect against bots is by integrating Google reCAPTCHA. reCAPTCHA is a free service provided by Google that helps to distinguish between human and automated traffic on websites. In this article, we'll explore how to integrate Google reCAPTCHA into an ASP.NET MVC application.
Prerequisites:
- Basic understanding of ASP.NET MVC
- Visual Studio installed on your system
- Google reCAPTCHA API keys (site key and secret key)
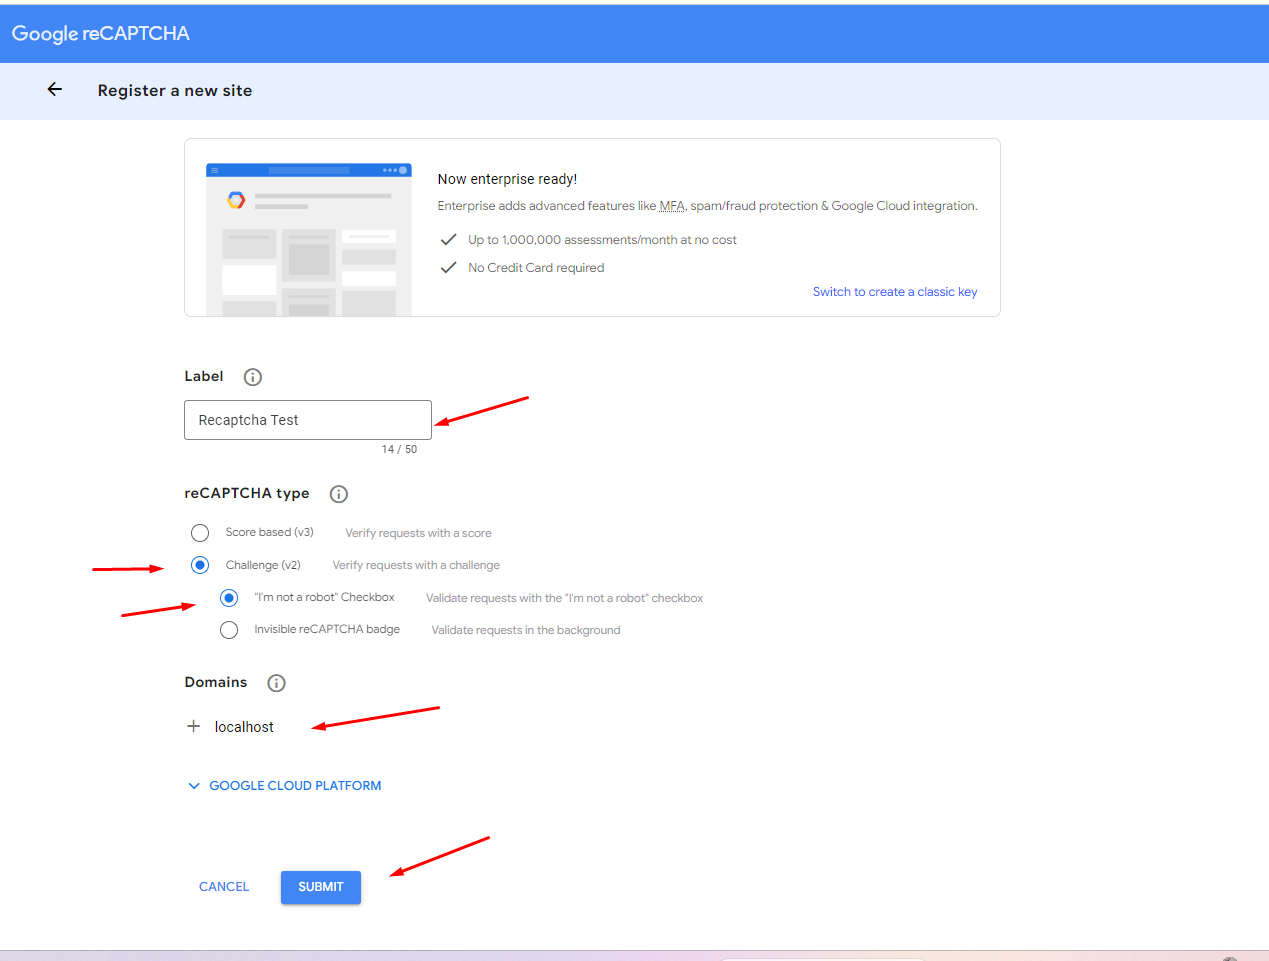
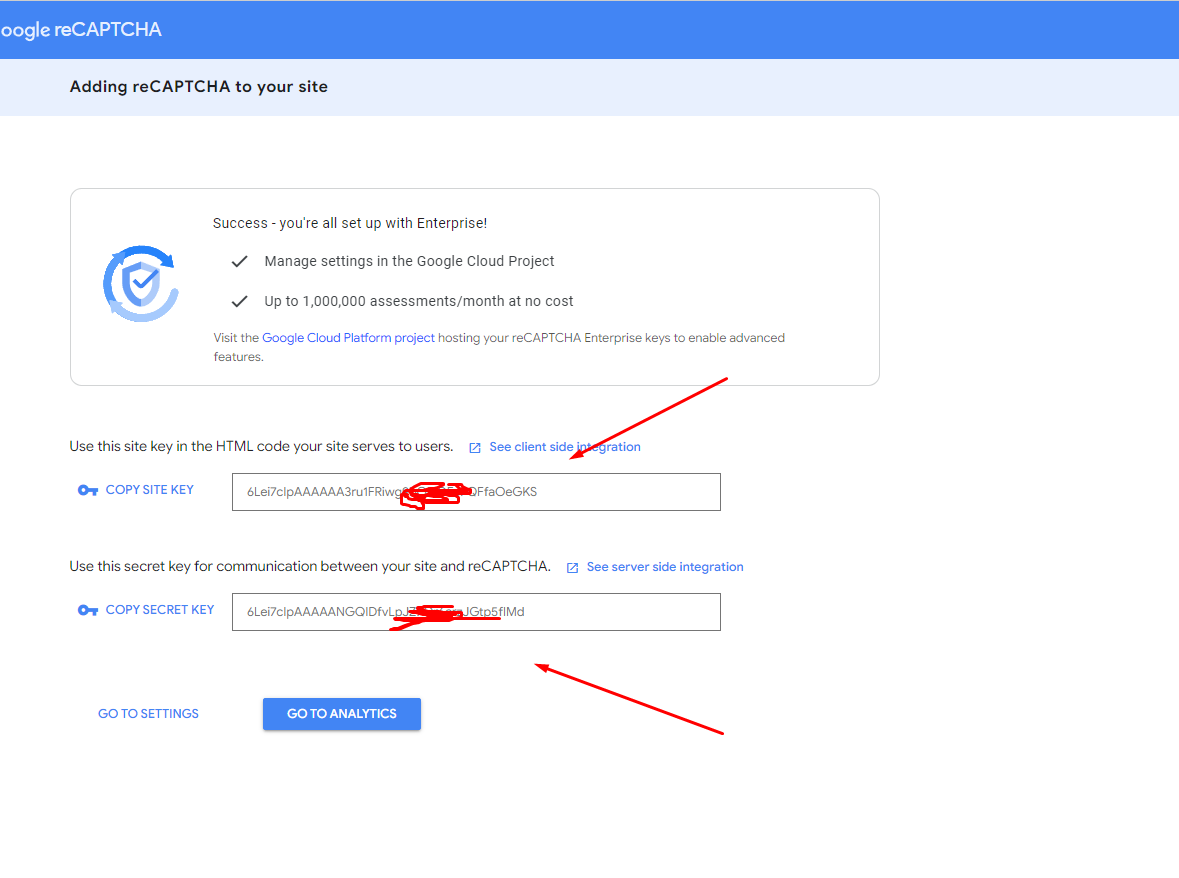
Step 1: Get reCAPTCHA API Keys:
Firstly, you need to obtain reCAPTCHA API keys from the Google reCAPTCHA website. Navigate to the reCAPTCHA admin console (https://www.google.com/recaptcha/admin) and register your site. Upon registration, you'll receive a site key and a secret key, which you'll use to integrate reCAPTCHA into your ASP.NET MVC application.
Step 2: Create an ASP.NET MVC Project:
Open Visual Studio and create a new ASP.NET MVC project. Name it as per your preference.
Step 3: Install Required Packages:
Install the necessary packages via NuGet Package Manager. You'll need:
- Microsoft.Ajax.Utilities
- Newtonsoft.Json
Step 4: Controller Implementation:
Create a controller (e.g., HomeController) with two actions: Index and Verify. The Index action will render the view with the reCAPTCHA widget, while the Verify action will handle the reCAPTCHA verification.
/* HomeController.cs */
using Microsoft.Ajax.Utilities;
using Newtonsoft.Json.Linq;
using System;
using System.Collections.Generic;
using System.Linq;
using System.Net;
using System.Web;
using System.Web.Mvc;

namespace Recaptcha.Controllers
{
    public class HomeController : Controller
    {
        public ActionResult Index()
        {
            return View();
        }

        [HttpPost]
        public ActionResult Verify()
        {
            // Verify reCAPTCHA
            var response = Request["g-recaptcha-response"];
            var client = new WebClient();
            var secretKey = "Your Secret kEy"; // Replace with your actual secret key
            var result = client.DownloadString($"https://www.google.com/recaptcha/api/siteverify?secret={secretKey}&response={response}");
            var obj = JObject.Parse(result);
            var status = (bool)obj.SelectToken("success");

            if (!status)
            {
                ModelState.AddModelError("", "reCAPTCHA validation failed.");
                return View("Index"); // Return the view to display the error message
            }
            return View("Index");
        }

        public ActionResult About()
        {
            ViewBag.Message = "Your application description page.";

            return View();
        }

        public ActionResult Contact()
        {
            ViewBag.Message = "Your contact page.";

            return View();
        }
    }
}
Step 5: Index View:
In the Index view, add the reCAPTCHA widget using the HTML provided by Google. Ensure to include the necessary JavaScript files and replace 'your_site_key' with your actual site key.
@{
    ViewBag.Title = "Home Page";
}

<main>
    <div class="row">
        @using (Html.BeginForm("Verify", "Home"))
        {
            <!-- Your other form fields -->

            <div class="g-recaptcha" data-sitekey="your-site-key"></div>
            <br />

            <input type="submit" value="Submit" />


            @Html.ValidationSummary(true, "", new { @class = "text-danger" })
        }
    </div>
</main>
<script src="https://www.google.com/recaptcha/api.js"
        async defer>
</script>
Ensure to replace 'your_site_key' in the View with your actual reCAPTCHA site key obtained from the Google reCAPTCHA admin console.
Step 6: Verify reCAPTCHA Response:
In the Verify action of the controller, extract the reCAPTCHA response from the request and send it to Google's reCAPTCHA verification endpoint along with your secret key. Parse the response to check if the verification was successful.
Step 7: Handle Verification Result:
Based on the verification result, you can proceed with the desired action. If the verification fails, display an error message to the user. If successful, continue with the intended functionality of your application.
Conclusion:
Integrating Google reCAPTCHA into your ASP.NET MVC application adds an extra layer of security by protecting against automated bot attacks. By following the steps outlined in this article, you can seamlessly implement reCAPTCHA and safeguard your application from malicious activities. Strengthen the security of your web application today by integrating Google reCAPTCHA!
So this is how to integrate Google reCAPTCHA Validation in ASP.NET MVC.
