
How to implement Authorize.Net Payment gateway in asp.net mvc
Integrate Authorize.Net in Asp.Net MVC
Authorize.Net is a leading payment gateway that empowers businesses to securely accept online payments, providing a robust and reliable platform for processing credit card transactions. Specifically tailored for the ASP.NET framework, Authorize.Net seamlessly integrates into web applications, offering a straightforward and efficient way for developers to implement secure payment processing functionality. With its extensive features, including fraud detection, subscription billing, and mobile-friendly options, Authorize.Net has become a go-to solution for businesses seeking a trusted and scalable payment processing solution within the ASP.NET ecosystem. In this blog, we will explore the key features and integration methods of Authorize.Net in ASP.NET, demonstrating how businesses can enhance their online payment capabilities while ensuring a seamless and secure customer experience., we have to follow these steps :First of all, take one Asp.net mvc application and we will install the AuthorizeNet Nuget package which is shown in the image below
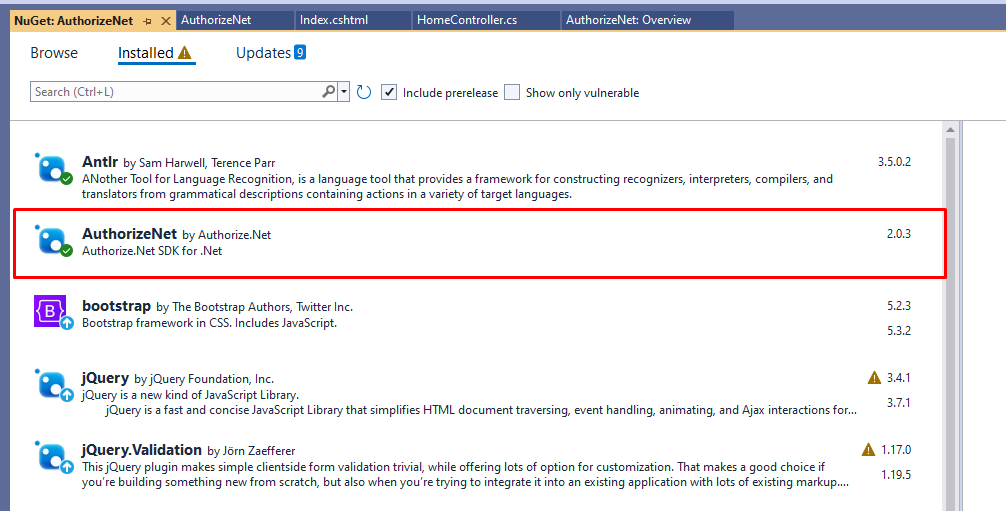
Install these packages from Nuget package
AuthorizeNet
After you have done installing the AuthorizeNet Nuget package we will have to take one new controller where we will add the AuthorizeNet integration code. You have to add these namespaces on the controller
using AuthorizeNet.Api.Contracts.V1;
using AuthorizeNet.Api.Controllers;
using AuthorizeNet.Api.Controllers.Bases;
So, now we have to add these methods in our controller, this method will help us initialize payment and redirect to the payment page
   public class HomeController : Controller
 {
     private const string ApiLoginId = "48G3qPaLS";
     private const string TransactionKey = "7G5p3k5k4v8SJtRs";

     public ActionResult Index()
     {
         return View();
     }
     [HttpPost]
     public ActionResult ProcessPayment(string cardNumber, string expirationDate, decimal amount)
     {
         try
         {
             var creditCard = new creditCardType
             {
                 cardNumber = cardNumber,
                 expirationDate = expirationDate
             };

             var paymentType = new paymentType { Item = creditCard };

             var transactionRequest = new transactionRequestType
             {
                 transactionType = transactionTypeEnum.authCaptureTransaction.ToString(),
                 amount = amount,
                 payment = paymentType
             };

             var request = new createTransactionRequest { transactionRequest = transactionRequest };

             ApiOperationBase<ANetApiRequest, ANetApiResponse>.RunEnvironment = AuthorizeNet.Environment.SANDBOX; // Change to AuthorizeNet.Environment.PRODUCTION for live transactions
             ApiOperationBase<ANetApiRequest, ANetApiResponse>.MerchantAuthentication = new merchantAuthenticationType
             {
                 name = ApiLoginId,
                 ItemElementName = ItemChoiceType.transactionKey,
                 Item = TransactionKey
             };

             var controller = new createTransactionController(request);
             controller.Execute();

             var response = controller.GetApiResponse();

             if (response != null && response.messages.resultCode == messageTypeEnum.Ok)
             {
                 // Payment successful
                 ViewBag.Message = "Payment successful!";
             }
             else
             {
                 // Payment failed
                 ViewBag.Message = $"Payment failed: {response?.messages?.message?[0]?.text}";
             }
         }
         catch (Exception ex)
         {
             // Handle exceptions
             ViewBag.Message = $"An error occurred: {ex.Message}";
         }

         return View("Index");
     }
 }
Here, please replace the API LoginId and Transaction Key credentials with your original credentials.
Now add following code on the view side to pick the card details and complete payment
@{
    ViewBag.Title = "Process Payment";
}

<h2>Process Payment</h2>

@using (Html.BeginForm("ProcessPayment", "Home", FormMethod.Post))
{
    <div>
        <label for="cardNumber">Card Number:</label>
        <input type="text" name="cardNumber" required />
    </div>
    <div>
        <label for="expirationDate">Expiration Date (MMYY):</label>
        <input type="text" name="expirationDate" required />
    </div>
    <div>
        <label for="amount">Amount:</label>
        <input type="number" name="amount" step="0.01" required />
    </div>
    <button type="submit">Submit Payment</button>
}

<p>@ViewBag.Message</p>
Now, we have to run the application and you will see this
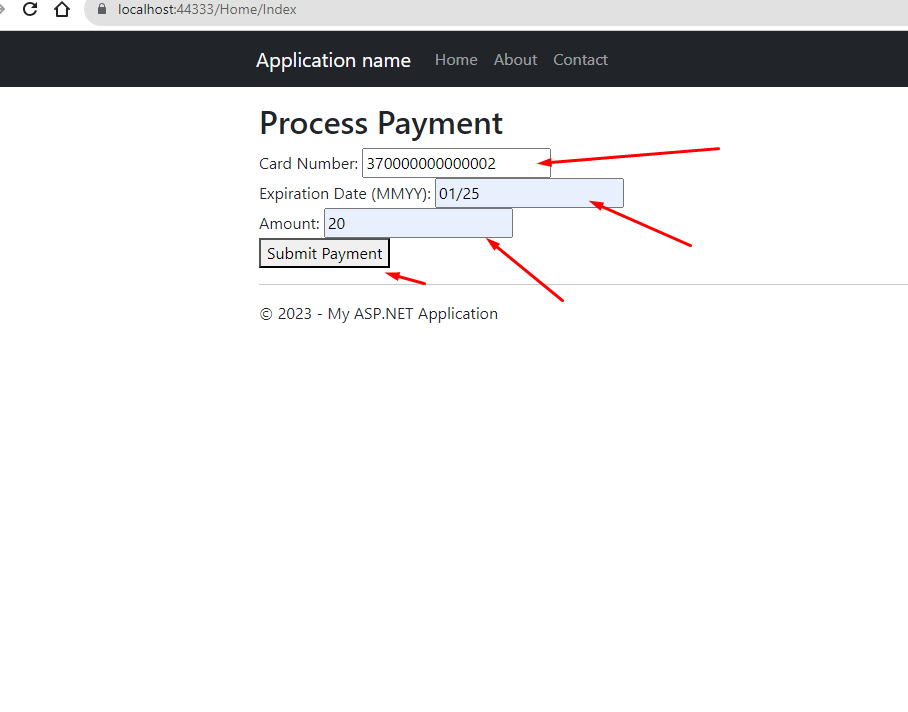
Here fill the details and use the card details given below and click on submit payment.

Now you can see the payment completed and success response from the authorize.net library. Now you can login to your Authorize.Net developer account and check the transactions
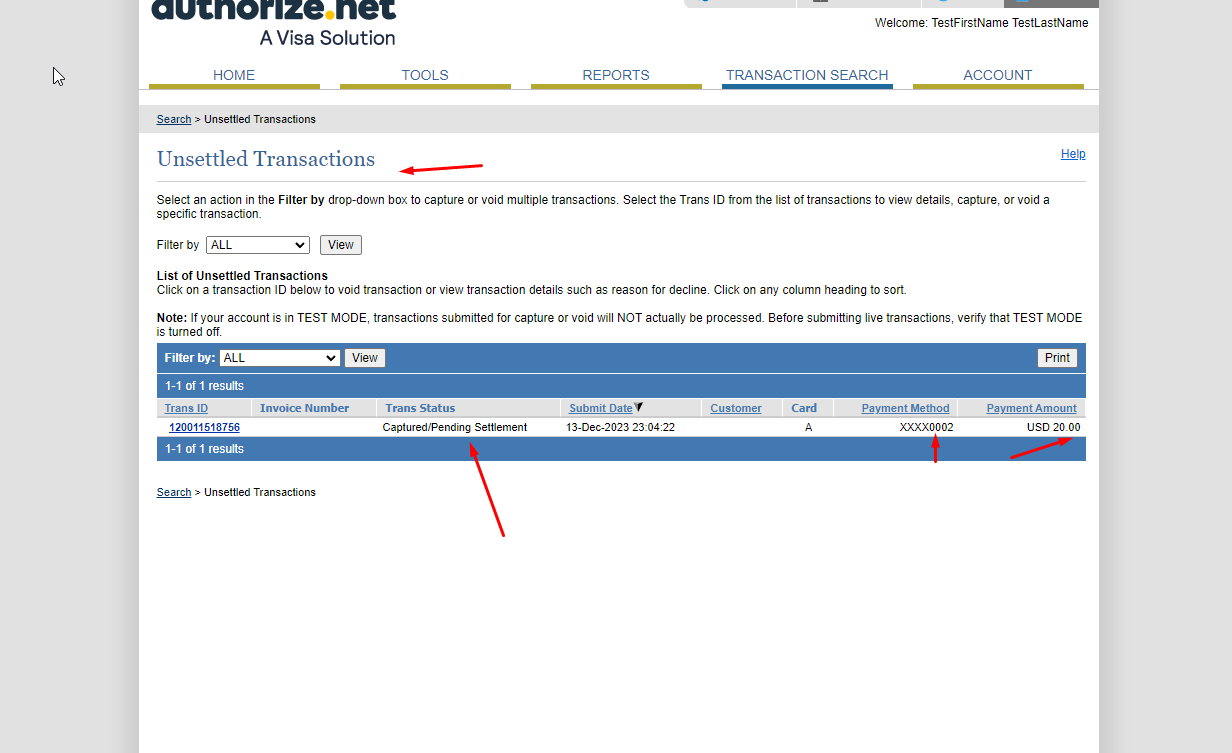
Unsettled transactions are the ones that got approved but haven't be moved to bank account yet and in process.
You can fill in the following details here for sandbox testing
Card Type: American Express
Card Number: 370000000000002
Expiration Date: 01/25
CVV: 123
So this is how we can make payment using Authorize.Net payment gatway and implement Autorize.Net payment gateway in asp.net mvc.
