Implement Stripe Payment Gateway In ASP.NET
Overview of Stripe Payment Gateway
Stripe is a popular payment processing platform that offers a wide range of features for businesses looking to accept payments online. It provides a simple and effective way to handle transactions, making it an ideal choice for developers and businesses alike. Stripe supports various payment methods, including credit and debit cards, and offers features such as recurring billing, fraud prevention, and detailed reporting.
Integrating Stripe into your ASP.NET application allows you to manage payments directly from your web application. This tutorial will walk you through the necessary steps to set up Stripe Checkout, a pre-built payment page that simplifies the payment process for users while ensuring security and compliance with PCI standards.
Prerequisites
Before you begin, ensure you have the following prerequisites:
- Basic knowledge of C# and ASP.NET Web Forms.
- Visual Studio 2017 or later installed on your computer.
- A Stripe account. You can sign up for a free account at stripe.com.
- Access to the internet to download necessary packages and access the Stripe API.
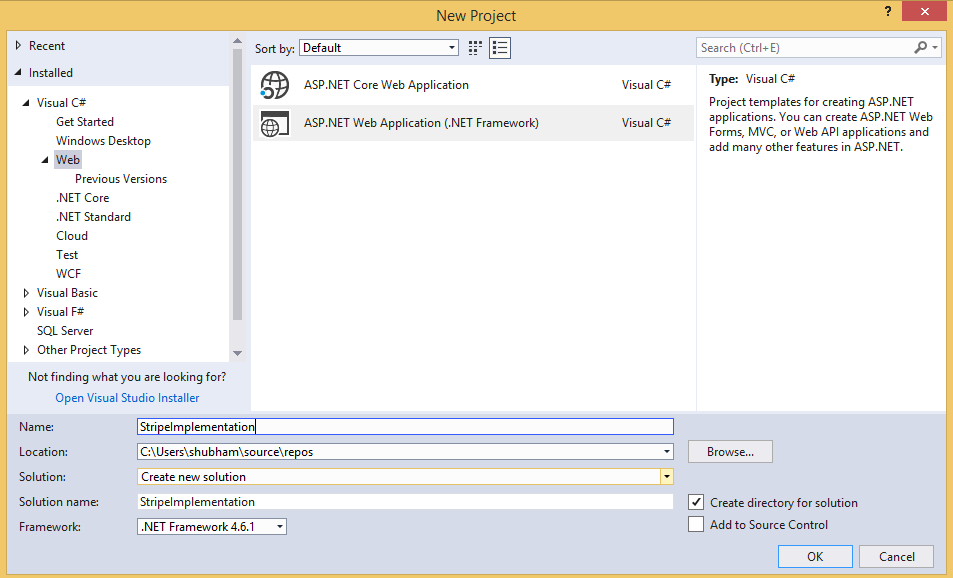
Step 1: Create the Project
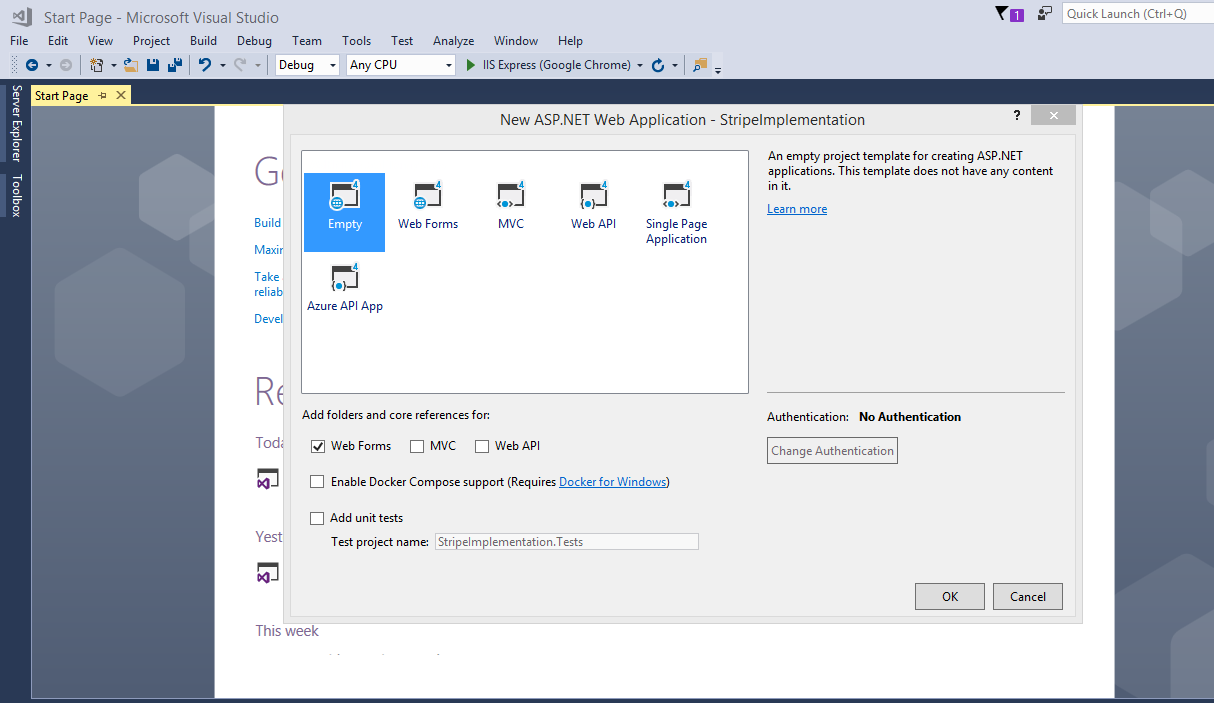
This tutorial was built with Visual Studio 2017 and .NET Framework 4.6.1. To follow along, you can also use any recent version of Visual Studio. Start by creating an ASP.NET application with the Empty template. In the project creation wizard, ensure that the Web Forms checkbox is enabled.
Start Visual Studio and create a new project:
- Select ASP.NET Web Application (.NET Framework).
- Provide a name and location for the project and click Next.
- Choose an Empty template and check MVC under Add folders & core references, then click OK.
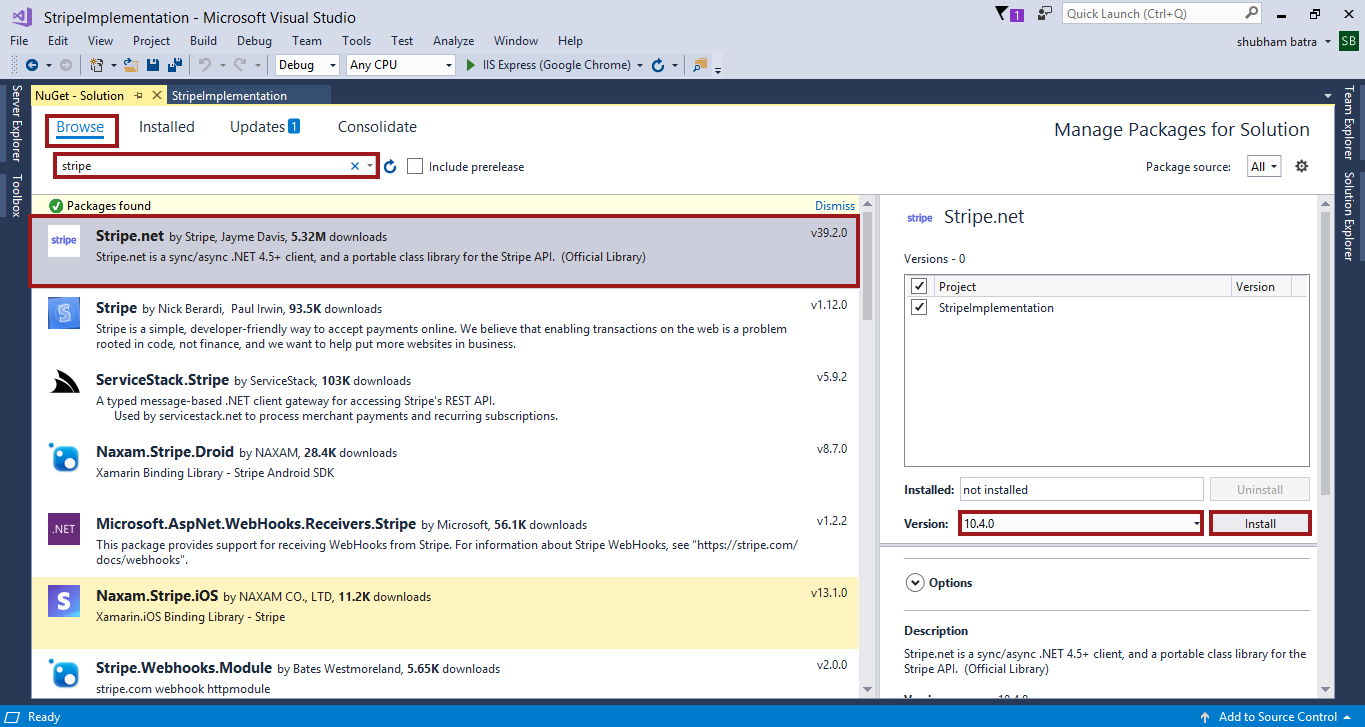
Step 2: Add the Stripe.net Package
To interact with the Stripe API, you need to install the Stripe.net package. This library provides the necessary classes and methods to perform payment transactions. To add the package, follow these steps:
- Right-click on your project in Solution Explorer and select Manage NuGet Packages.
- Search for Stripe.net in the Browse tab.
- Select the package and click Install.
Step 3: Configure Your Application
After adding the Stripe.net package, you need to configure your application to use your Stripe API keys. Open the Web.config file and add the following appSettings section:
<appSettings>
    <add key="StripeSecretKey" value="sk_test_51HOyZnDZeDIryO9RxF7t5trgvvgfMofkDiD9879121116009703ndb5e2UOLvZ3cWtJfLZa1t5JRFBnmhEjmQG2G66xbJCtWGzKoHgwZW4D40070xvqUHe" />
    <add key="StripePublishableKey" value="pk_test_51HOyZnDZehghgffdfddrsdffxhhlVXWxhO8xHPtT9Jtd6765552C2LCbyjwADWUykwcCxNsTPKHaZfanP9mzZjW1BVG3wxhewwGDFPP600YZlwGByS" />
</appSettings>
Next, go to the Global.asax.cs file and add the following using statements at the top:
using System.Web.Configuration;
using Stripe;
Modify the Application_Start method in the Global.asax.cs class to retrieve the secret key from the application settings and pass it to the Stripe client library:
protected void Application_Start(object sender, EventArgs e) {
    var secretKey = WebConfigurationManager.AppSettings["StripeSecretKey"];
    StripeConfiguration.SetApiKey(secretKey);
}
Step 4: Create the Payment Web Form
Create a new Web Form called Payment.aspx. In the file, add the following HTML markup inside of the <body> tag:
<form action="/RedirectForm.aspx" method="POST">
    <input type="text" id="TextBox1" placeholder="amount" name="amount" /><br />
    <input type="text" id="TextBox2" placeholder="name" name="name" /><br />
    <input type="text" id="TextBox3" placeholder="description" name="description" /><br />
    <input type="text" id="TextBox4" placeholder="locale" name="locale" /><br />
    <input type="text" id="TextBox5" placeholder="zip-code" name="zip-code" /><br />
    <script src="https://checkout.stripe.com/checkout.js" class="stripe-button" data-key="<%= stripePublishableKey %>"></script>
</form>
The HTML <script> tag loads and initializes Checkout. It adds a button to the form that the user can click to display the credit card overlay. The overlay automatically performs validation and error handling. The action attribute specifies the path of the Charge route created in the next step. The data-key attribute of the <script> tag uses the value of a variable called stripePublishableKey. To define that variable, edit the underlying Payment.aspx.cs file and add it to the class definition, extracting the value from the configuration file:
public string stripePublishableKey = WebConfigurationManager.AppSettings["StripePublishableKey"];Step 5: Create a Page to Perform the Charge
Now that the payment form is set up, you need to create a page that will handle the charge. Create a new Web Form called RedirectForm.aspx. In this page, you will process the payment after the user submits the form. Add the following code to the RedirectForm.aspx.cs file:
if (Request.Form["stripeToken"] != null)
            {
                var customers = new StripeCustomerService();
                var charges = new StripeChargeService();

                var customer = customers.Create(new StripeCustomerCreateOptions
                {
                    Email = Request.Form["stripeEmail"],
                    SourceToken = Request.Form["stripeToken"]

                });

                var charge = charges.Create(new StripeChargeCreateOptions
                {
                    Amount =Convert.ToInt32(Request.Form["amount"])*100,
                    Description = "Sample Charge",
                    Currency = "inr",
                    CustomerId = customer.Id,
                    Shipping=new StripeShippingOptions {Name="Shubham",CityOrTown="Ku",Country="India",Line1="2637",PostalCode="132103",Phone="232323",State="Haryana" }

                });

                Console.WriteLine(charge);
            }
This code retrieves the payment details from the form, creates a charge using the Stripe API, and handles the success or failure of the transaction. You can customize the response to provide better feedback to the user.
Edge Cases & Gotchas
When integrating Stripe, there are a few edge cases and common pitfalls to be aware of:
- Invalid API Keys: Ensure that you are using the correct API keys. Test mode keys will not work in production.
- Handling Currencies: Be mindful of the currency you are accepting. Ensure that the amount is specified in the smallest unit (e.g., cents for USD).
- Network Issues: Payment processing relies on network connectivity. Implement error handling to manage timeouts or connectivity issues gracefully.
- Security Compliance: Always ensure that your integration complies with PCI DSS standards. Avoid storing sensitive card information on your servers.
Performance & Best Practices
To ensure a smooth user experience and optimal performance when integrating Stripe, consider the following best practices:
- Use Stripe Elements: Instead of using Checkout, consider using Stripe Elements for a more customizable UI while still maintaining security.
- Handle Webhooks: Implement webhooks to handle asynchronous events such as charge success or failure, refunds, etc.
- Test Thoroughly: Use Stripe's test mode to thoroughly test your integration before going live. Ensure that all edge cases are handled.
- Monitor Transactions: Regularly monitor your transactions and logs to identify any issues or fraudulent activities.
Conclusion
Integrating a payment gateway like Stripe into your ASP.NET application can significantly enhance your application's functionality and user experience. By following this tutorial, you've learned how to create a payment form, process transactions, and handle potential issues that may arise.
- Stripe provides a secure and efficient way to handle payments.
- Always use test keys during development to avoid unintended charges.
- Implement error handling to manage any issues that may occur during payment processing.
- Consider using webhooks for handling asynchronous payment events.
In the web browser, click the button to launch the payment form. If you’re using Stripe test keys, you can test it with some dummy data. Enter the test number 4242 4242 4242 4242, a three-digit 123, and the future expiry date. Submit the form and see if the application correctly displays the successful charge page.
